Guide to Fine-Tuning and Deploying YOLOv11 for Object Tracking

October 21, 2024

Introduction to Object Tracking with YOLOv11

YOLOv11, released in October 2024, is the latest iteration of the "You Only Look Once" (YOLO) series, designed for real-time object detection. This model introduces significant enhancements over its predecessors, focusing on efficiency, accuracy, and versatility in various applications.

Standout Features of YOLOv11

  • Improved Accuracy and Efficiency: YOLOv11m achieves higher mean Average Precision (mAP) on the COCO dataset while utilizing 22% fewer parameters than YOLOv8m. This makes it computationally efficient without sacrificing performance.
  • Versatile Task Support: The model supports a wide range of computer vision tasks, including Object Detection, Instance Segmentation, Image Classification, Pose Estimation, and Oriented Object Detection (OBB).
  • Enhanced Feature Extraction: With an improved backbone and neck architecture, YOLOv11 enhances feature extraction capabilities, leading to more precise object detection.
  • Optimized for Speed: The architectural improvements allow for faster processing rates, making YOLOv11 suitable for real-time applications. It reportedly operates up to 2% faster than its predecessor, YOLOv10.
  • Adaptability: YOLOv11 can be deployed across various environments, including edge devices and cloud platforms, ensuring flexibility in application.

Industries That Can Benefit from YOLOv11

YOLOv11's advanced object tracking technology can significantly impact several industries:

  • Transportation: For vehicle tracking and traffic management systems.
  • Retail: Enhancing customer experience through people tracking and inventory management.
  • Healthcare: Assisting in medical image analysis and monitoring patient movements.
  • Security: Implementing surveillance systems that require real-time object detection and tracking.
  • Agriculture: Monitoring livestock or crop health through aerial imagery analysis.
  • Robotics: Enabling robots to navigate and interact with their environments by recognizing objects in real-time.

Our Aim in This Tutorial

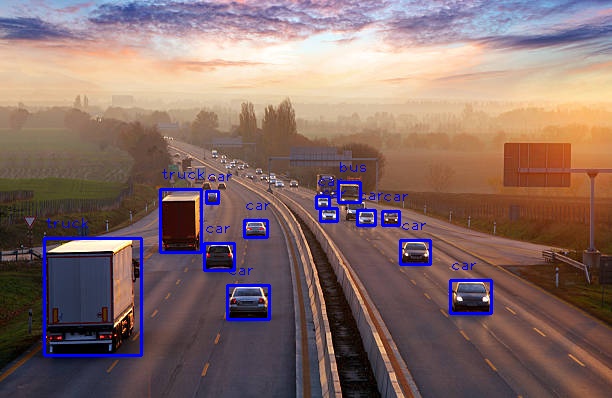
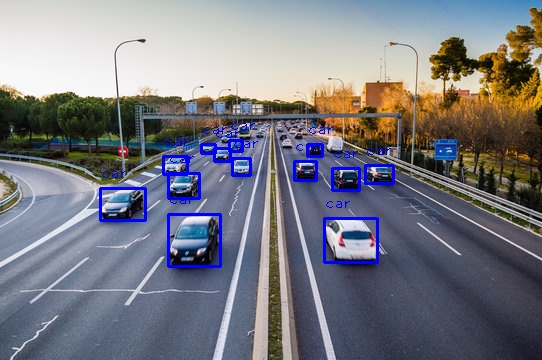
In this guide, we’ll take you through the process of fine-tuning and deploying YOLOv11 to detect and track specific objects, such as humans, cars, and packaging. By tailoring the model to recognize these categories, you can apply it to various scenarios, including monitoring traffic on highways, detecting people in work environments, or identifying packaging in manufacturing or retail settings.

Whether you are aiming to enhance operational efficiency, improve safety, or optimize resource management, this step-by-step guide will show you how to effectively train and deploy YOLOv11 for your object tracking needs. Let's get started!

Let’s Code

Step 1: Installing the Necessary Libraries

The first library, OpenCV (installed via opencv-python), is a powerful tool for handling various computer vision tasks. It enables the manipulation and analysis of visual data, including images and video streams, which is essential for tasks like object detection, tracking, and recognition.

The second library, Ultralytics, provides the framework to implement YOLO models, including the latest YOLOv11. YOLO (You Only Look Once) is a real-time object detection system known for its speed and accuracy. The Ultralytics library simplifies the deployment and fine-tuning of YOLO models, allowing users to detect objects efficiently in various environments.


!pip install opencv-python ultralytics

Step 2: Importing the Libraries


import cv2
from ultralytics import YOLO


Step 3: Training the Model

First, the yolo command runs a pre-trained YOLOv11 model (yolo11m.pt) to detect objects in an image. The task=detect specifies that the task is object detection, and mode=predict means it is using the model to make predictions. The source parameter provides the image URL (in this case, an image of a bus) where the object detection will be applied.

The second part of the code involves loading the YOLOv11 model (YOLO("/content/yolo11m.pt")) and training it further on a custom dataset. Here, the dataset for car detection is specified in the file car.yaml, and the model is trained for 100 epochs with images resized to 640x640 pixels. This fine-tuning step is crucial for adapting the pre-trained YOLOv11 model to specific tasks, such as detecting cars, by learning patterns specific to the new dataset.

Overall, this code demonstrates both the deployment of a pre-trained model for object detection and the customization of the model through additional training.


!yolo task=detect mode=predict model=yolo11m.pt source="https://ultralytics.com/images/bus.jpg"

model = YOLO("/content/yolo11m.pt")

# Train the model
results = model.train(data="/content/car.yaml", epochs=100, imgsz=640)

Here’s an example of the dataset structure:

This dataset structure is organized to train and test the YOLO model for object detection. It follows a clear separation between training and testing data, ensuring that the model can be both trained and evaluated effectively.

  • /train: This folder contains the images and corresponding label files used for training the model. Each image (e.g., image1.jpg, image2.jpg) has an associated label file in the /labels subdirectory (e.g., image1.txt, image2.txt), which provides the bounding box coordinates and class labels for objects in each image.
  • /test: Similar to the /train directory, this folder holds images and label files but is meant for testing the model's performance. These files are used to evaluate how well the trained model performs on unseen data.
  • dataset.yaml: This configuration file provides the necessary metadata for the YOLO model to understand the dataset structure. It typically includes information such as the paths to the training and testing data, the number of classes, and class names. This file helps guide the training process by defining how the model should interpret the dataset.

Overall, this structured layout ensures that both the training and evaluation processes are well-organized and streamlined for fine-tuning the YOLO model.


/dataset
│
├── /train
│   ├── image1.jpg
│   ├── image2.jpg
│   ├── ...
│   └── labels
│       ├── image1.txt
│       ├── image2.txt
│       └── ...
│
├── /test
│   ├── imageA.jpg
│   ├── imageB.jpg
│   ├── ...
│   └── labels
│       ├── imageA.txt
│       ├── imageB.txt
│       └── ...
│
└── dataset.yaml

Step 4: Choosing the Model


# Load the fine-tuned model
model = YOLO("/content/runs/detect/train/weights/best.pt")

Step 5: Creating Videowriter to Save Results of the Video

This function, create_video_writer, is designed to initialize a video writer for saving processed video frames into an MP4 file.

  • The function takes two inputs:some text
    • video_cap: A video capture object (usually created using OpenCV), which provides access to the video stream.
    • output_filename: The name of the output MP4 file where the video will be saved.
  • The function extracts key properties from the video stream, such as:some text
    • Frame width and height: The resolution of the video.
    • FPS (frames per second): The frame rate of the video.
  • It then initializes a FourCC (Four Character Code), which defines the video codec to use for encoding. In this case, it uses 'MP4V', the codec for MP4 video.
  • Finally, the function creates and returns a VideoWriter object, which can be used to write frames to the specified output file. This function is essential when you want to process video frames (like adding object detection boxes) and save the results into a new video file.


# defining function for creating a writer (for mp4 videos)
def create_video_writer(video_cap, output_filename):
    # grab the width, height, and fps of the frames in the video stream.
    frame_width = int(video_cap.get(cv2.CAP_PROP_FRAME_WIDTH))
    frame_height = int(video_cap.get(cv2.CAP_PROP_FRAME_HEIGHT))
    fps = int(video_cap.get(cv2.CAP_PROP_FPS))
    # initialize the FourCC and a video writer object
    fourcc = cv2.VideoWriter_fourcc(*'MP4V')
    writer = cv2.VideoWriter(output_filename, fourcc, fps,
                             (frame_width, frame_height))
    return writer

Step 5: Detecting Objects in Videos with YOLOv11

This code block processes a video using object detection and writes the results into a new output video file.

Here’s a brief overview of what it does:

  1. Video Input/Output Setup:some text
    • output_filename: Defines the name of the output video file where processed frames will be saved (e.g., "YourFilename.mp4").
    • video_path: Points to the input video file (e.g., "YourVideoPath.mp4").
    • cv2.VideoCapture(video_path): Opens the video stream from the specified file.
    • create_video_writer(cap, output_filename): Creates a writer to save processed video frames using the function defined earlier.
  2. Frame-by-Frame Processing:some text
    • A loop reads frames from the video stream using cap.read(). If a frame is successfully read (success is True), it proceeds to the next steps; otherwise, it exits the loop.
    • The frame is passed to predict_and_detect(model, img, classes=[], conf=0.5), which performs object detection using the specified YOLO model. The detected objects are then drawn on the frame (result_img).
    • The processed frame is written to the output file using writer.write(result_img).
    • The frame is also displayed in a window using cv2.imshow("Image", result_img) for real-time visualization.
  3. Cleanup:some text
    • The writer.release() ensures that the video writer is properly closed and the video file is saved correctly when processing is complete.

This code processes an entire video, applying object detection to each frame, saving the result into a new video, and displaying the processed frames in real time.


output_filename = "YourFilename.mp4"

video_path = r"YourVideoPath.mp4"
cap = cv2.VideoCapture(video_path)
writer = create_video_writer(cap, output_filename)
while True:
   success, img = cap.read()
   if not success:
       break
   result_img, _ = predict_and_detect(model, img, classes=[], conf=0.5)
   writer.write(result_img)
   cv2.imshow("Image", result_img)
  
   cv2.waitKey(1)
writer.release()

The Whole Code


import cv2
from ultralytics import YOLO

def predict(chosen_model, img, classes=[], conf=0.5):
   if classes:
       results = chosen_model.predict(img, classes=classes, conf=conf)
   else:
       results = chosen_model.predict(img, conf=conf)

   return results

def predict_and_detect(chosen_model, img, classes=[], conf=0.5, rectangle_thickness=2, text_thickness=1):
   results = predict(chosen_model, img, classes, conf=conf)
   for result in results:
       for box in result.boxes:
           cv2.rectangle(img, (int(box.xyxy[0][0]), int(box.xyxy[0][1])),
                         (int(box.xyxy[0][2]), int(box.xyxy[0][3])), (255, 0, 0), rectangle_thickness)
           cv2.putText(img, f"{result.names[int(box.cls[0])]}",
                       (int(box.xyxy[0][0]), int(box.xyxy[0][1]) - 10),
                       cv2.FONT_HERSHEY_PLAIN, 1, (255, 0, 0), text_thickness)
   return img, results

# defining function for creating a writer (for mp4 videos)
def create_video_writer(video_cap, output_filename):
   # grab the width, height, and fps of the frames in the video stream.
   frame_width = int(video_cap.get(cv2.CAP_PROP_FRAME_WIDTH))
   frame_height = int(video_cap.get(cv2.CAP_PROP_FRAME_HEIGHT))
   fps = int(video_cap.get(cv2.CAP_PROP_FPS))
   # initialize the FourCC and a video writer object
   fourcc = cv2.VideoWriter_fourcc(*'MP4V')
   writer = cv2.VideoWriter(output_filename, fourcc, fps,
                            (frame_width, frame_height))
   return writer

model = YOLO("/content/runs/detect/train/weights/best.pt")

output_filename = "YourFilename.mp4"

video_path = r"YourVideoPath.mp4"
cap = cv2.VideoCapture(video_path)
writer = create_video_writer(cap, output_filename)
while True:
   success, img = cap.read()
   if not success:
       break
   result_img, _ = predict_and_detect(model, img, classes=[], conf=0.5)
   writer.write(result_img)
   cv2.imshow("Image", result_img)
  
   cv2.waitKey(1)
writer.release()

Video Links

For Image Processing


from ultralytics import YOLO
import cv2

def predict(chosen_model, img, classes=[], conf=0.5):
   if classes:
       results = chosen_model.predict(img, classes=classes, conf=conf)
   else:
       results = chosen_model.predict(img, conf=conf)

   return results


def predict_and_detect(chosen_model, img, classes=[], conf=0.5, rectangle_thickness=2, text_thickness=1):
   results = predict(chosen_model, img, classes, conf=conf)
   for result in results:
       for box in result.boxes:
           cv2.rectangle(img, (int(box.xyxy[0][0]), int(box.xyxy[0][1])),
                         (int(box.xyxy[0][2]), int(box.xyxy[0][3])), (255, 0, 0), rectangle_thickness)
           cv2.putText(img, f"{result.names[int(box.cls[0])]}",
                       (int(box.xyxy[0][0]), int(box.xyxy[0][1]) - 10),
                       cv2.FONT_HERSHEY_PLAIN, 1, (255, 0, 0), text_thickness)
   return img, results

model = YOLO("/content/runs/detect/train/weights/best.pt")

# read the image
image = cv2.imread("YourImagePath.png")
result_img, _ = predict_and_detect(model, image, classes=[], conf=0.5)

cv2.imshow("Image", result_img)
cv2.imwrite("YourSavePath.png", result_img)
cv2.waitKey(0)

This code defines two functions to handle object detection using a YOLO model and applies them to an image, displaying the result.

  1. predict function:some text
    • This function makes predictions using the given chosen_model (a YOLO model). It takes the image (img), a list of classes to detect (classes=[]), and a confidence threshold (conf=0.5).
    • If specific classes are provided, it filters the detection to those classes; otherwise, it performs detection on all object classes in the image.
  2. predict_and_detect function:some text
    • This builds on the predict function to not only make predictions but also draw bounding boxes around detected objects in the image.
    • For each object detected, a bounding box (rectangle) is drawn using the coordinates provided by YOLO (box.xyxy). The class name of the detected object is displayed above the box using cv2.putText().
    • The rectangle_thickness and text_thickness parameters control the thickness of the bounding box and text.
  3. Model and Image Handling:some text
    • The YOLO model is loaded from the specified path (/content/runs/detect/train/weights/best.pt), which is assumed to be a trained model.
    • An image is loaded using OpenCV (cv2.imread("YourImagePath.png")), and then passed to the predict_and_detect function for processing.
    • The processed image, with object detections and bounding boxes, is displayed (cv2.imshow("Image", result_img)) and saved to a file (cv2.imwrite("YourSavePath.png", result_img)).

This code performs object detection on a single image and visualizes the results by drawing rectangles around detected objects and labeling them with their class names.

Conclusion

Today, we delved into the fascinating world of object detection and demonstrated how powerful it can be in various applications. 

To get started with Flux.1-dev, sign up to E2E Cloud today, and launch a cloud GPU node, or head to TIR. E2E Cloud offers the most price-performant cloud GPUs in the Indian market, and enables developers to use advanced GPUs like H200, H100, A100 for application development.

Latest Blogs
This is a decorative image for: A Complete Guide To Customer Acquisition For Startups
October 18, 2022

A Complete Guide To Customer Acquisition For Startups

Any business is enlivened by its customers. Therefore, a strategy to constantly bring in new clients is an ongoing requirement. In this regard, having a proper customer acquisition strategy can be of great importance.

So, if you are just starting your business, or planning to expand it, read on to learn more about this concept.

The problem with customer acquisition

As an organization, when working in a diverse and competitive market like India, you need to have a well-defined customer acquisition strategy to attain success. However, this is where most startups struggle. Now, you may have a great product or service, but if you are not in the right place targeting the right demographic, you are not likely to get the results you want.

To resolve this, typically, companies invest, but if that is not channelized properly, it will be futile.

So, the best way out of this dilemma is to have a clear customer acquisition strategy in place.

How can you create the ideal customer acquisition strategy for your business?

  • Define what your goals are

You need to define your goals so that you can meet the revenue expectations you have for the current fiscal year. You need to find a value for the metrics –

  • MRR – Monthly recurring revenue, which tells you all the income that can be generated from all your income channels.
  • CLV – Customer lifetime value tells you how much a customer is willing to spend on your business during your mutual relationship duration.  
  • CAC – Customer acquisition costs, which tells how much your organization needs to spend to acquire customers constantly.
  • Churn rate – It tells you the rate at which customers stop doing business.

All these metrics tell you how well you will be able to grow your business and revenue.

  • Identify your ideal customers

You need to understand who your current customers are and who your target customers are. Once you are aware of your customer base, you can focus your energies in that direction and get the maximum sale of your products or services. You can also understand what your customers require through various analytics and markers and address them to leverage your products/services towards them.

  • Choose your channels for customer acquisition

How will you acquire customers who will eventually tell at what scale and at what rate you need to expand your business? You could market and sell your products on social media channels like Instagram, Facebook and YouTube, or invest in paid marketing like Google Ads. You need to develop a unique strategy for each of these channels. 

  • Communicate with your customers

If you know exactly what your customers have in mind, then you will be able to develop your customer strategy with a clear perspective in mind. You can do it through surveys or customer opinion forms, email contact forms, blog posts and social media posts. After that, you just need to measure the analytics, clearly understand the insights, and improve your strategy accordingly.

Combining these strategies with your long-term business plan will bring results. However, there will be challenges on the way, where you need to adapt as per the requirements to make the most of it. At the same time, introducing new technologies like AI and ML can also solve such issues easily. To learn more about the use of AI and ML and how they are transforming businesses, keep referring to the blog section of E2E Networks.

Reference Links

https://www.helpscout.com/customer-acquisition/

https://www.cloudways.com/blog/customer-acquisition-strategy-for-startups/

https://blog.hubspot.com/service/customer-acquisition

This is a decorative image for: Constructing 3D objects through Deep Learning
October 18, 2022

Image-based 3D Object Reconstruction State-of-the-Art and trends in the Deep Learning Era

3D reconstruction is one of the most complex issues of deep learning systems. There have been multiple types of research in this field, and almost everything has been tried on it — computer vision, computer graphics and machine learning, but to no avail. However, that has resulted in CNN or convolutional neural networks foraying into this field, which has yielded some success.

The Main Objective of the 3D Object Reconstruction

Developing this deep learning technology aims to infer the shape of 3D objects from 2D images. So, to conduct the experiment, you need the following:

  • Highly calibrated cameras that take a photograph of the image from various angles.
  • Large training datasets can predict the geometry of the object whose 3D image reconstruction needs to be done. These datasets can be collected from a database of images, or they can be collected and sampled from a video.

By using the apparatus and datasets, you will be able to proceed with the 3D reconstruction from 2D datasets.

State-of-the-art Technology Used by the Datasets for the Reconstruction of 3D Objects

The technology used for this purpose needs to stick to the following parameters:

  • Input

Training with the help of one or multiple RGB images, where the segmentation of the 3D ground truth needs to be done. It could be one image, multiple images or even a video stream.

The testing will also be done on the same parameters, which will also help to create a uniform, cluttered background, or both.

  • Output

The volumetric output will be done in both high and low resolution, and the surface output will be generated through parameterisation, template deformation and point cloud. Moreover, the direct and intermediate outputs will be calculated this way.

  • Network architecture used

The architecture used in training is 3D-VAE-GAN, which has an encoder and a decoder, with TL-Net and conditional GAN. At the same time, the testing architecture is 3D-VAE, which has an encoder and a decoder.

  • Training used

The degree of supervision used in 2D vs 3D supervision, weak supervision along with loss functions have to be included in this system. The training procedure is adversarial training with joint 2D and 3D embeddings. Also, the network architecture is extremely important for the speed and processing quality of the output images.

  • Practical applications and use cases

Volumetric representations and surface representations can do the reconstruction. Powerful computer systems need to be used for reconstruction.

Given below are some of the places where 3D Object Reconstruction Deep Learning Systems are used:

  • 3D reconstruction technology can be used in the Police Department for drawing the faces of criminals whose images have been procured from a crime site where their faces are not completely revealed.
  • It can be used for re-modelling ruins at ancient architectural sites. The rubble or the debris stubs of structures can be used to recreate the entire building structure and get an idea of how it looked in the past.
  • They can be used in plastic surgery where the organs, face, limbs or any other portion of the body has been damaged and needs to be rebuilt.
  • It can be used in airport security, where concealed shapes can be used for guessing whether a person is armed or is carrying explosives or not.
  • It can also help in completing DNA sequences.

So, if you are planning to implement this technology, then you can rent the required infrastructure from E2E Networks and avoid investing in it. And if you plan to learn more about such topics, then keep a tab on the blog section of the website

Reference Links

https://tongtianta.site/paper/68922

https://github.com/natowi/3D-Reconstruction-with-Deep-Learning-Methods

This is a decorative image for: Comprehensive Guide to Deep Q-Learning for Data Science Enthusiasts
October 18, 2022

A Comprehensive Guide To Deep Q-Learning For Data Science Enthusiasts

For all data science enthusiasts who would love to dig deep, we have composed a write-up about Q-Learning specifically for you all. Deep Q-Learning and Reinforcement learning (RL) are extremely popular these days. These two data science methodologies use Python libraries like TensorFlow 2 and openAI’s Gym environment.

So, read on to know more.

What is Deep Q-Learning?

Deep Q-Learning utilizes the principles of Q-learning, but instead of using the Q-table, it uses the neural network. The algorithm of deep Q-Learning uses the states as input and the optimal Q-value of every action possible as the output. The agent gathers and stores all the previous experiences in the memory of the trained tuple in the following order:

State> Next state> Action> Reward

The neural network training stability increases using a random batch of previous data by using the experience replay. Experience replay also means the previous experiences stocking, and the target network uses it for training and calculation of the Q-network and the predicted Q-Value. This neural network uses openAI Gym, which is provided by taxi-v3 environments.

Now, any understanding of Deep Q-Learning   is incomplete without talking about Reinforcement Learning.

What is Reinforcement Learning?

Reinforcement is a subsection of ML. This part of ML is related to the action in which an environmental agent participates in a reward-based system and uses Reinforcement Learning to maximize the rewards. Reinforcement Learning is a different technique from unsupervised learning or supervised learning because it does not require a supervised input/output pair. The number of corrections is also less, so it is a highly efficient technique.

Now, the understanding of reinforcement learning is incomplete without knowing about Markov Decision Process (MDP). MDP is involved with each state that has been presented in the results of the environment, derived from the state previously there. The information which composes both states is gathered and transferred to the decision process. The task of the chosen agent is to maximize the awards. The MDP optimizes the actions and helps construct the optimal policy.

For developing the MDP, you need to follow the Q-Learning Algorithm, which is an extremely important part of data science and machine learning.

What is Q-Learning Algorithm?

The process of Q-Learning is important for understanding the data from scratch. It involves defining the parameters, choosing the actions from the current state and also choosing the actions from the previous state and then developing a Q-table for maximizing the results or output rewards.

The 4 steps that are involved in Q-Learning:

  1. Initializing parameters – The RL (reinforcement learning) model learns the set of actions that the agent requires in the state, environment and time.
  2. Identifying current state – The model stores the prior records for optimal action definition for maximizing the results. For acting in the present state, the state needs to be identified and perform an action combination for it.
  3. Choosing the optimal action set and gaining the relevant experience – A Q-table is generated from the data with a set of specific states and actions, and the weight of this data is calculated for updating the Q-Table to the following step.
  4. Updating Q-table rewards and next state determination – After the relevant experience is gained and agents start getting environmental records. The reward amplitude helps to present the subsequent step.  

In case the Q-table size is huge, then the generation of the model is a time-consuming process. This situation requires Deep Q-learning.

Hopefully, this write-up has provided an outline of Deep Q-Learning and its related concepts. If you wish to learn more about such topics, then keep a tab on the blog section of the E2E Networks website.

Reference Links

https://analyticsindiamag.com/comprehensive-guide-to-deep-q-learning-for-data-science-enthusiasts/

https://medium.com/@jereminuerofficial/a-comprehensive-guide-to-deep-q-learning-8aeed632f52f

This is a decorative image for: GAUDI: A Neural Architect for Immersive 3D Scene Generation
October 13, 2022

GAUDI: A Neural Architect for Immersive 3D Scene Generation

The evolution of artificial intelligence in the past decade has been staggering, and now the focus is shifting towards AI and ML systems to understand and generate 3D spaces. As a result, there has been extensive research on manipulating 3D generative models. In this regard, Apple’s AI and ML scientists have developed GAUDI, a method specifically for this job.

An introduction to GAUDI

The GAUDI 3D immersive technique founders named it after the famous architect Antoni Gaudi. This AI model takes the help of a camera pose decoder, which enables it to guess the possible camera angles of a scene. Hence, the decoder then makes it possible to predict the 3D canvas from almost every angle.

What does GAUDI do?

GAUDI can perform multiple functions –

  • The extensions of these generative models have a tremendous effect on ML and computer vision. Pragmatically, such models are highly useful. They are applied in model-based reinforcement learning and planning world models, SLAM is s, or 3D content creation.
  • Generative modelling for 3D objects has been used for generating scenes using graf, pigan, and gsn, which incorporate a GAN (Generative Adversarial Network). The generator codes radiance fields exclusively. Using the 3D space in the scene along with the camera pose generates the 3D image from that point. This point has a density scalar and RGB value for that specific point in 3D space. This can be done from a 2D camera view. It does this by imposing 3D datasets on those 2D shots. It isolates various objects and scenes and combines them to render a new scene altogether.
  • GAUDI also removes GANs pathologies like mode collapse and improved GAN.
  • GAUDI also uses this to train data on a canonical coordinate system. You can compare it by looking at the trajectory of the scenes.

How is GAUDI applied to the content?

The steps of application for GAUDI have been given below:

  • Each trajectory is created, which consists of a sequence of posed images (These images are from a 3D scene) encoded into a latent representation. This representation which has a radiance field or what we refer to as the 3D scene and the camera path is created in a disentangled way. The results are interpreted as free parameters. The problem is optimized by and formulation of a reconstruction objective.
  • This simple training process is then scaled to trajectories, thousands of them creating a large number of views. The model samples the radiance fields totally from the previous distribution that the model has learned.
  • The scenes are thus synthesized by interpolation within the hidden space.
  • The scaling of 3D scenes generates many scenes that contain thousands of images. During training, there is no issue related to canonical orientation or mode collapse.
  • A novel de-noising optimization technique is used to find hidden representations that collaborate in modelling the camera poses and the radiance field to create multiple datasets with state-of-the-art performance in generating 3D scenes by building a setup that uses images and text.

To conclude, GAUDI has more capabilities and can also be used for sampling various images and video datasets. Furthermore, this will make a foray into AR (augmented reality) and VR (virtual reality). With GAUDI in hand, the sky is only the limit in the field of media creation. So, if you enjoy reading about the latest development in the field of AI and ML, then keep a tab on the blog section of the E2E Networks website.

Reference Links

https://www.researchgate.net/publication/362323995_GAUDI_A_Neural_Architect_for_Immersive_3D_Scene_Generation

https://www.technology.org/2022/07/31/gaudi-a-neural-architect-for-immersive-3d-scene-generation/ 

https://www.patentlyapple.com/2022/08/apple-has-unveiled-gaudi-a-neural-architect-for-immersive-3d-scene-generation.html

Build on the most powerful infrastructure cloud

A vector illustration of a tech city using latest cloud technologies & infrastructure