What Is TIR?
The TIR AI Platform, by E2E networks, is a comprehensive and robust cloud-based environment designed for various machine learning and artificial intelligence operations. This platform provides users with a suite of tools and services to develop, deploy, and manage AI models effectively.
Key features of the TIR AI Platform include:
-
Dashboard: A central hub for monitoring and managing AI projects, providing users with a quick overview of container usage, dataset readiness, running inference services, and pipeline runs.
-
Containers: Support for launching and managing containers, which are isolated environments where users can build and run their AI models.
-
Datasets: Functionality for creating and handling datasets, which are critical for training and evaluating machine learning models.
-
Inference: Dedicated services for running inference tasks, where trained models make predictions on new data. The platform includes support for NVIDIA Triton, a GPU-optimized inference server, and other frameworks such as TensorRT-LLM and PyTorch Serve, which offer optimized performance for different types of AI models.
-
Pipelines: Tools to create and manage pipelines, enabling the automation of workflows for continuous integration and delivery of machine learning projects.
-
API Tokens: Integration features that allow for the generation and management of API tokens, facilitating secure access to the platform's features programmatically.
-
Quick Access: A user-friendly interface with shortcuts to frequently used features like launching containers, creating datasets, and starting inference services.
-
Activity Timeline: An audit log that tracks user activities and system events, providing transparency and aiding in troubleshooting.
-
Foundation Studio, Integrations, and Settings: Additional tools and settings to customize and extend the capabilities of the platform, such as integrating with external services and configuring project settings.
The platform is designed to support a variety of frameworks and tools popular in the AI community, ensuring that it can cater to a wide range of use cases and preferences. The visual layout emphasizes ease of use, with a clear navigation sidebar and a main panel that highlights the most important actions and information.
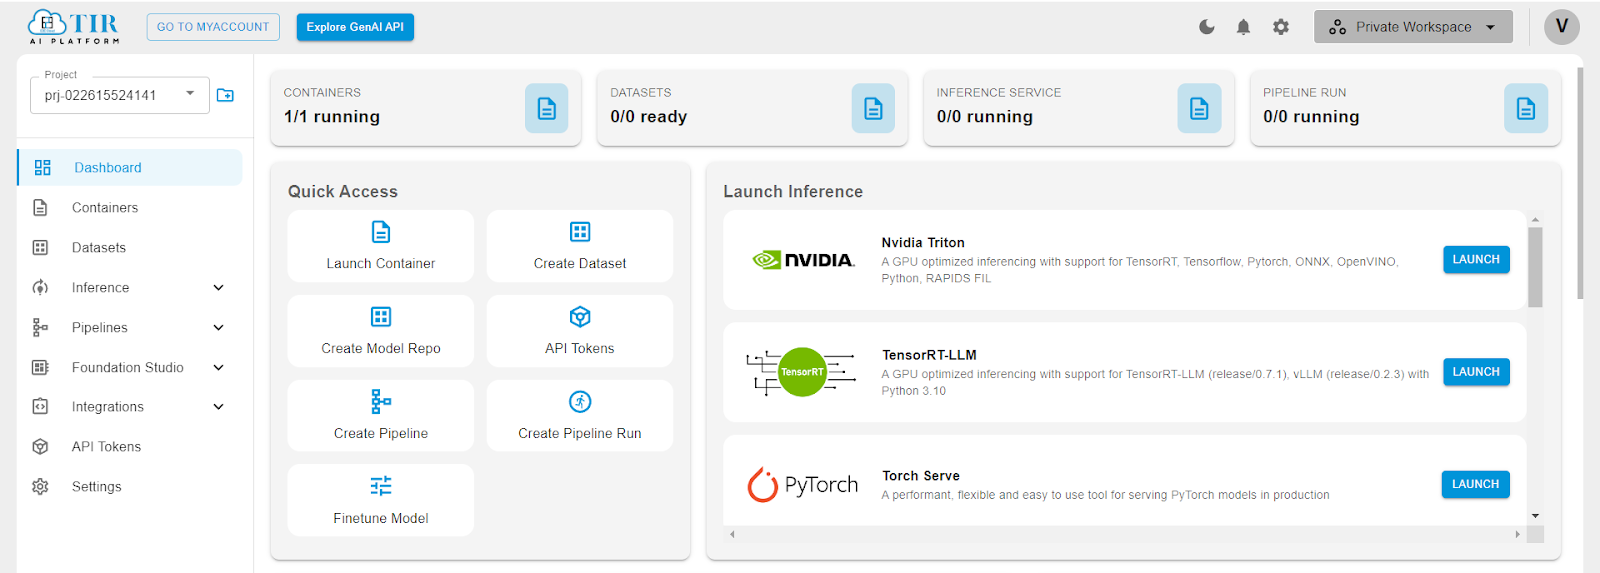
The platform is suitable for data scientists, machine learning engineers, and AI researchers looking for an end-to-end solution to build and deploy AI models. With its robust infrastructure and suite of tools, the TIR AI Platform aims to streamline the development lifecycle of AI projects and accelerate the path from experimentation to production.
Let’s go over the features of the platform one by one.
Features of the TIR Platform
Launching a Jupyter Notebook
Click on Containers on the left panel, then click on CREATE CONTAINER.
A container is basically a lightweight, standalone package that encapsulates all the code, libraries, and dependencies required to run a specific AI or machine learning application. Containers provide a consistent and isolated environment across different development, testing, and production settings, ensuring that the application behaves the same way regardless of the underlying infrastructure.
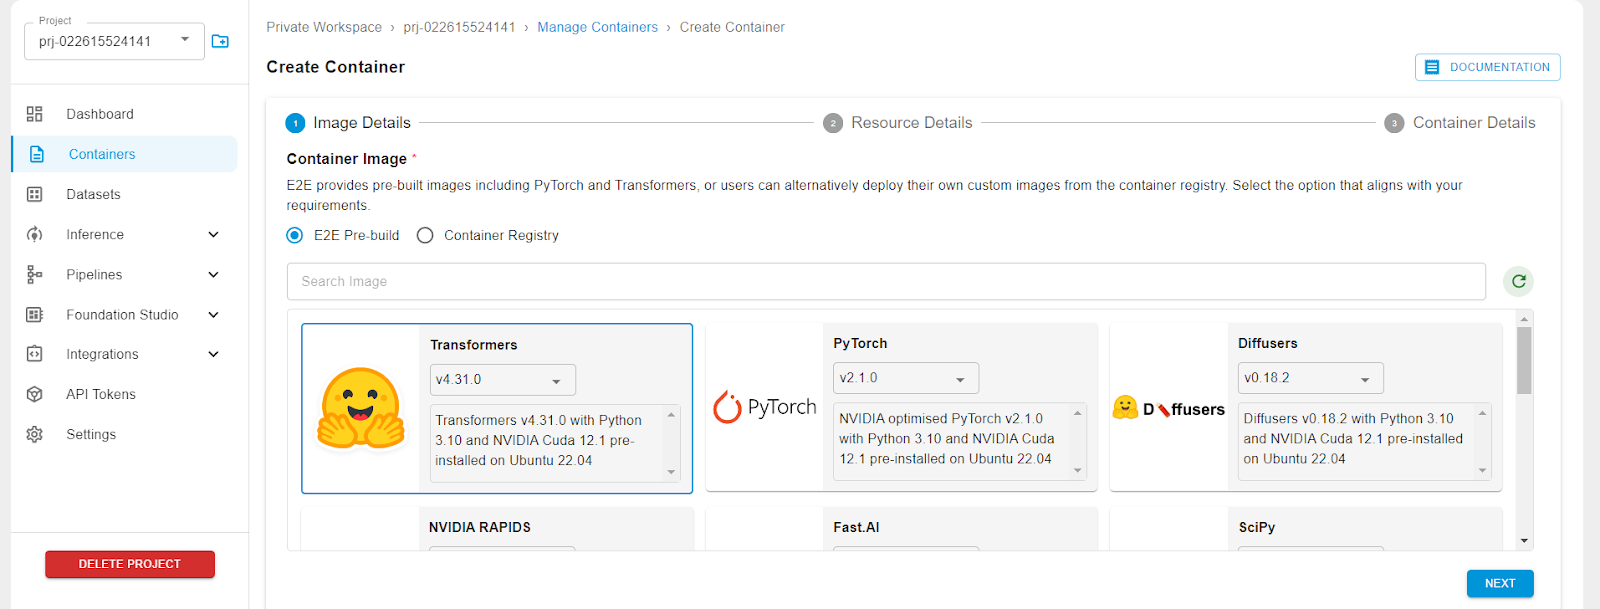
Select a base image of the library that you would like pre-installed in your environment. For e.g., Transformers.
Then select your GPU plan.
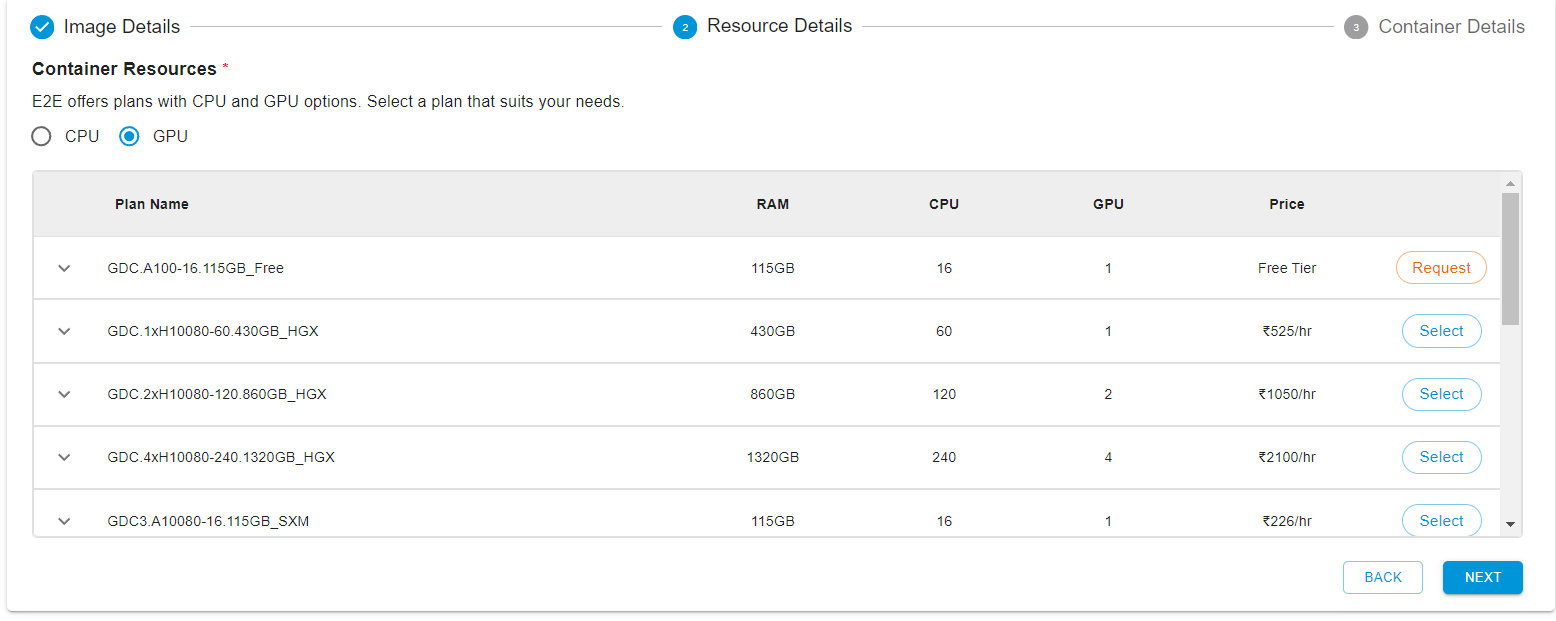
After that, you can create the container. If you wish, you can enable SSH on this container if you want to connect to the notebook instance from within your local terminal. Once created, you can access the Jupyter notebook lab url as shown below.

Datasets
To create a new dataset on the TIR AI platform, follow these steps:
-
Ensure you're in the correct project or create a new one if necessary.
-
Navigate to the ‘Datasets’ section of the platform.
When you click on ‘CREATE DATASET’, you'll be taken to a screen where you can choose between two storage types for your dataset: ‘EOS Bucket’ and ‘DISK’.
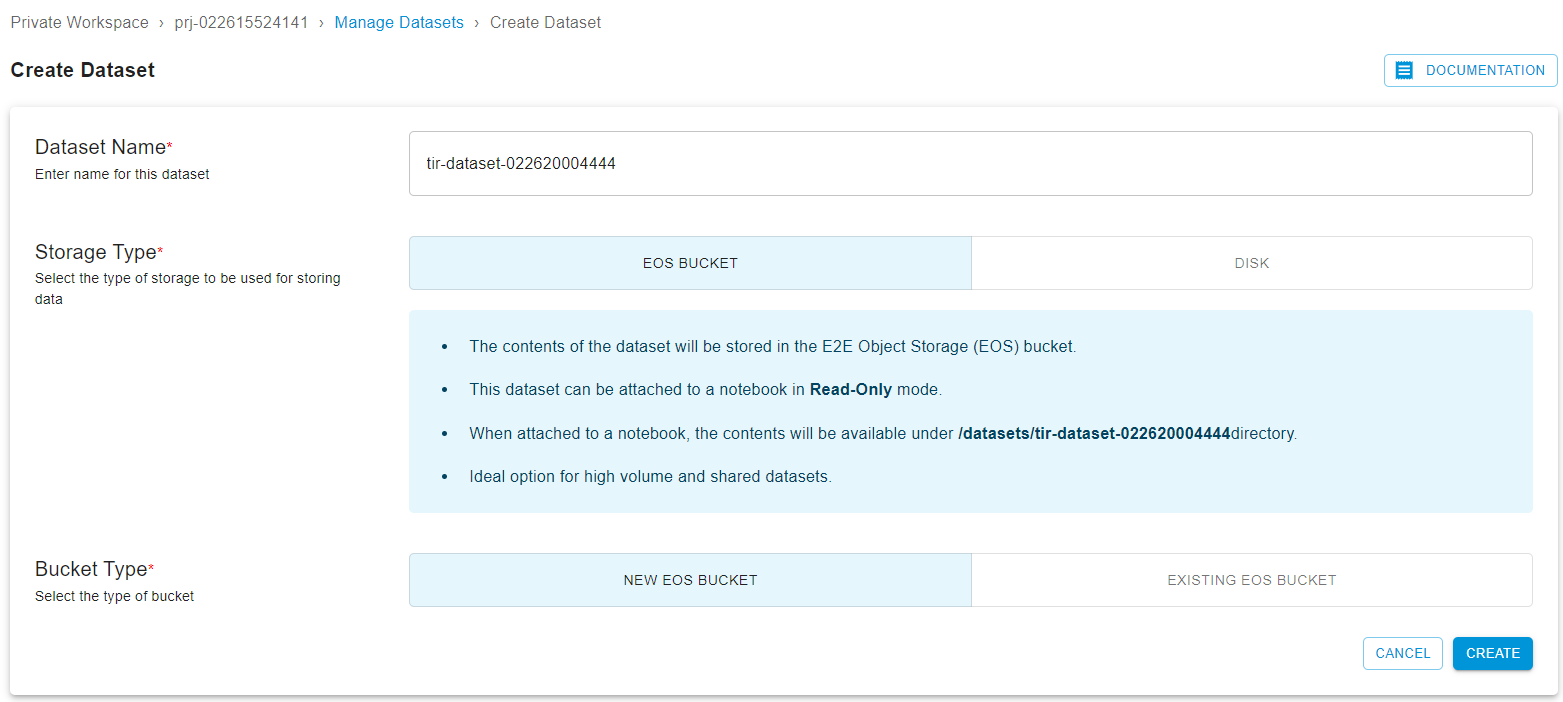
EOS Bucket: There are two sub-options here:
- New EOS Bucket: Selecting this will generate a new EOS bucket associated with your account, complete with access keys. You'll need to name your dataset and click ‘CREATE’.
- Existing EOS Bucket: Use this option if you want to link to an already existing bucket. Again, name your dataset and click ‘CREATE’.
After creating an EOS Bucket, you will be guided through the process of setting up Minio CLI and S3cmd for data upload and will receive details about your dataset and bucket.
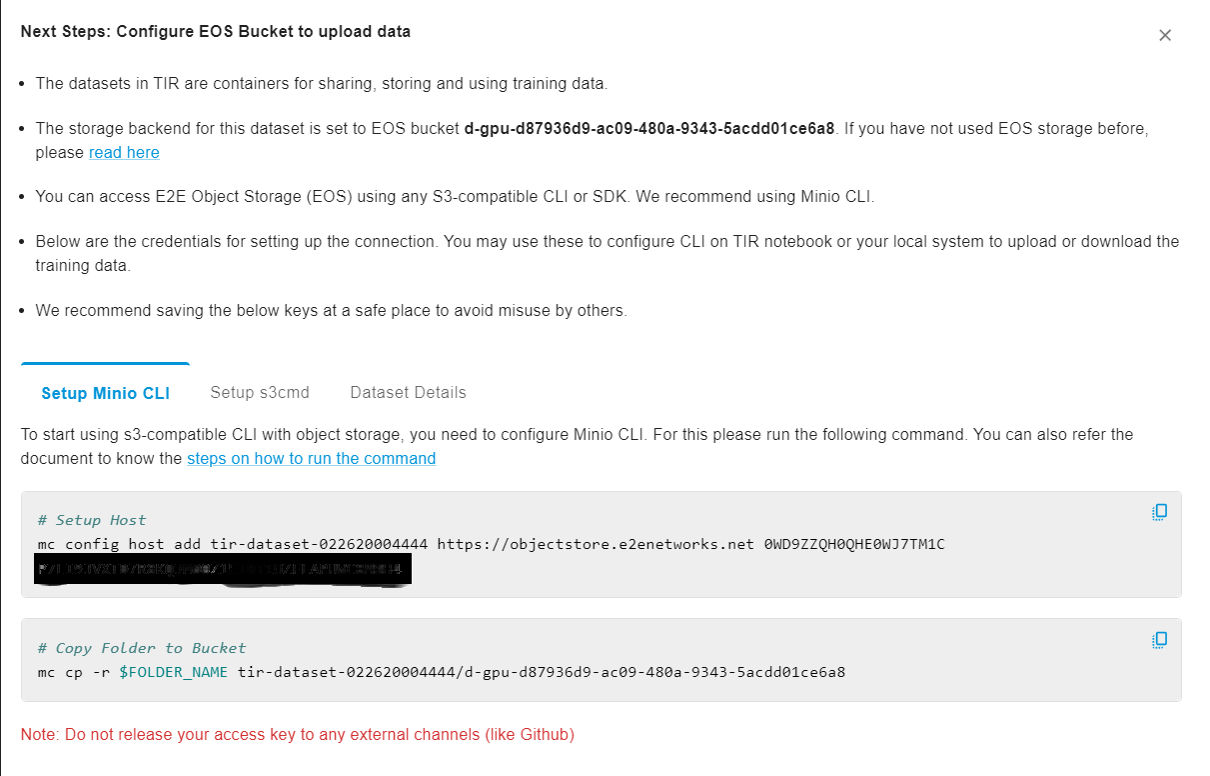
DISK: Choosing DISK as the storage type allows you to define the disk size, charged at a rate of 5 INR per GB per month. Note that while you can't decrease disk size later, you can increase it. Name your dataset, set the disk size, and click ‘CREATE.’
Post creation, you'll have tabs for ‘Setup’, ‘Overview’, and ‘Data Objects’:

- Setup: This area provides instructions on configuring the EOS Bucket, setting up the Minio client, and the S3cmd utility.
- Overview: Here, you'll find dataset details like the name, creator, creation date, and storage details such as storage type, bucket name, access keys, and EOS endpoints.
- Data Objects: This is where you can upload, download, or delete data. You can upload files by dragging them into the upload area or selecting them manually, and manage them once uploaded.

If you need to delete a dataset, simply select it from the list and click the ‘Delete’ button. Confirm the deletion in the pop-up that appears.
Inference
For inferencing you can use the frameworks provided by the platform itself to create a model endpoint:
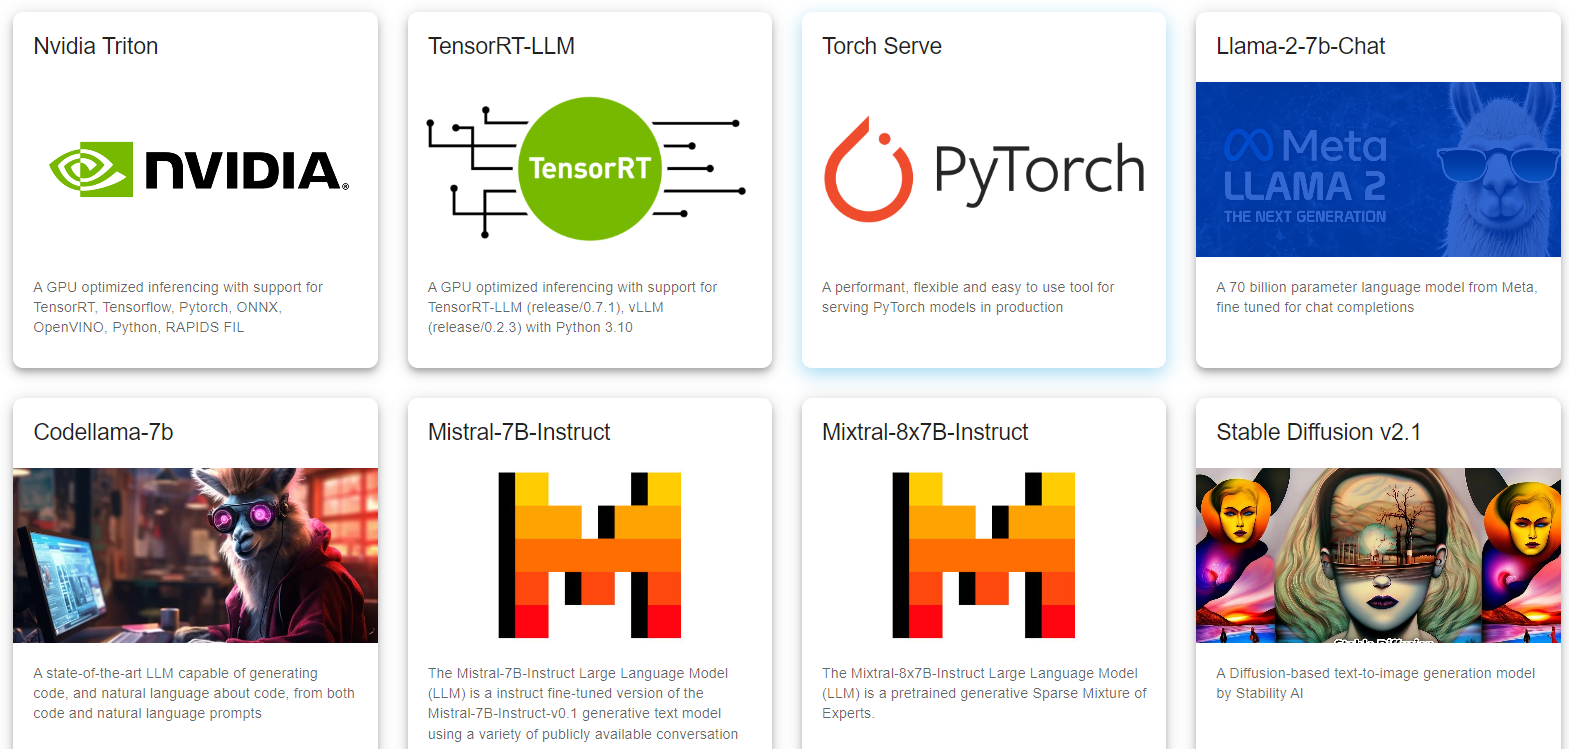
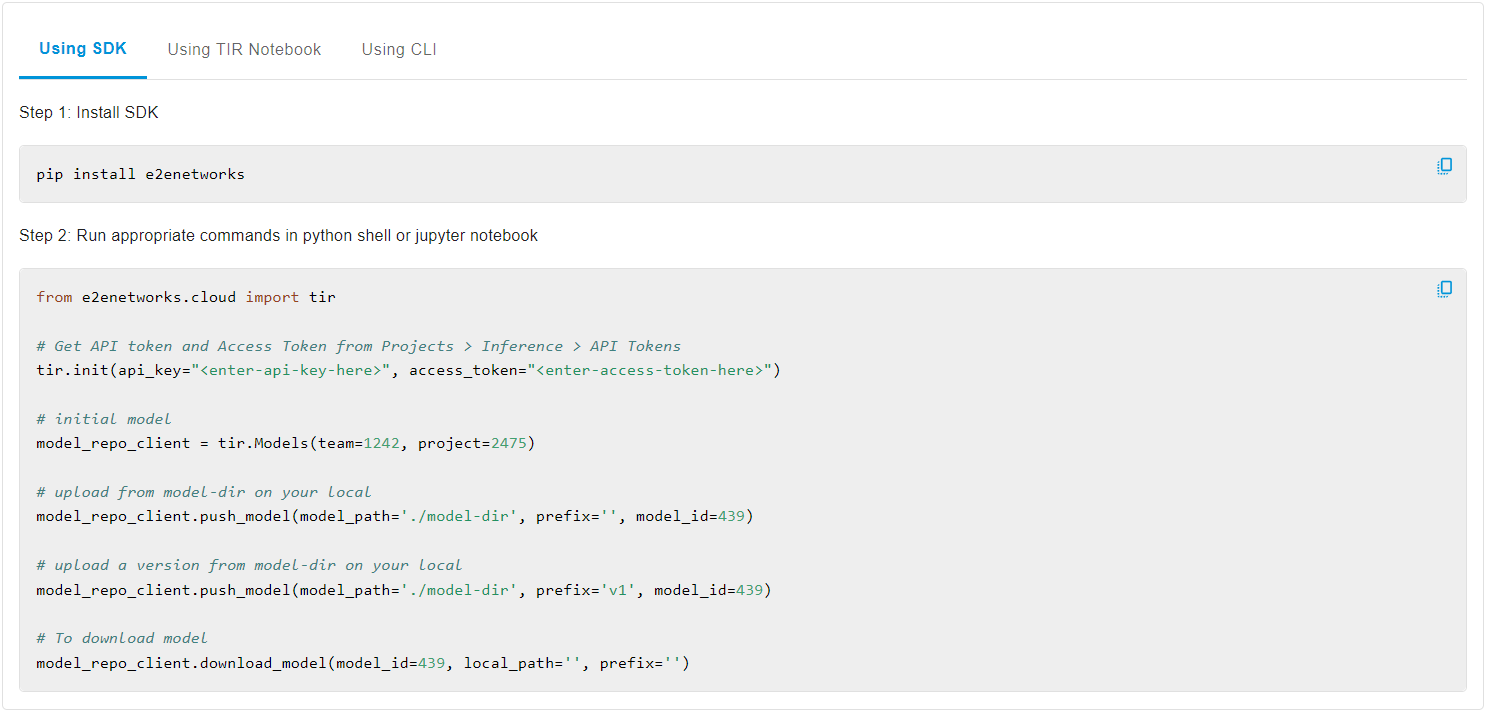
Alternatively, you can also create a mode repository so as to deploy your own custom models.

Click on the CREATE REPOSITORY for creating a new model repository.
Then using the SDK or TIR Notebook or the CLI you can manage the model files in the repo.
TIR offers two primary methods to deploy an inference service for your AI model:
- Deploy with TIR's Pre-Built Containers
To use TIR's pre-built containers for deployment:
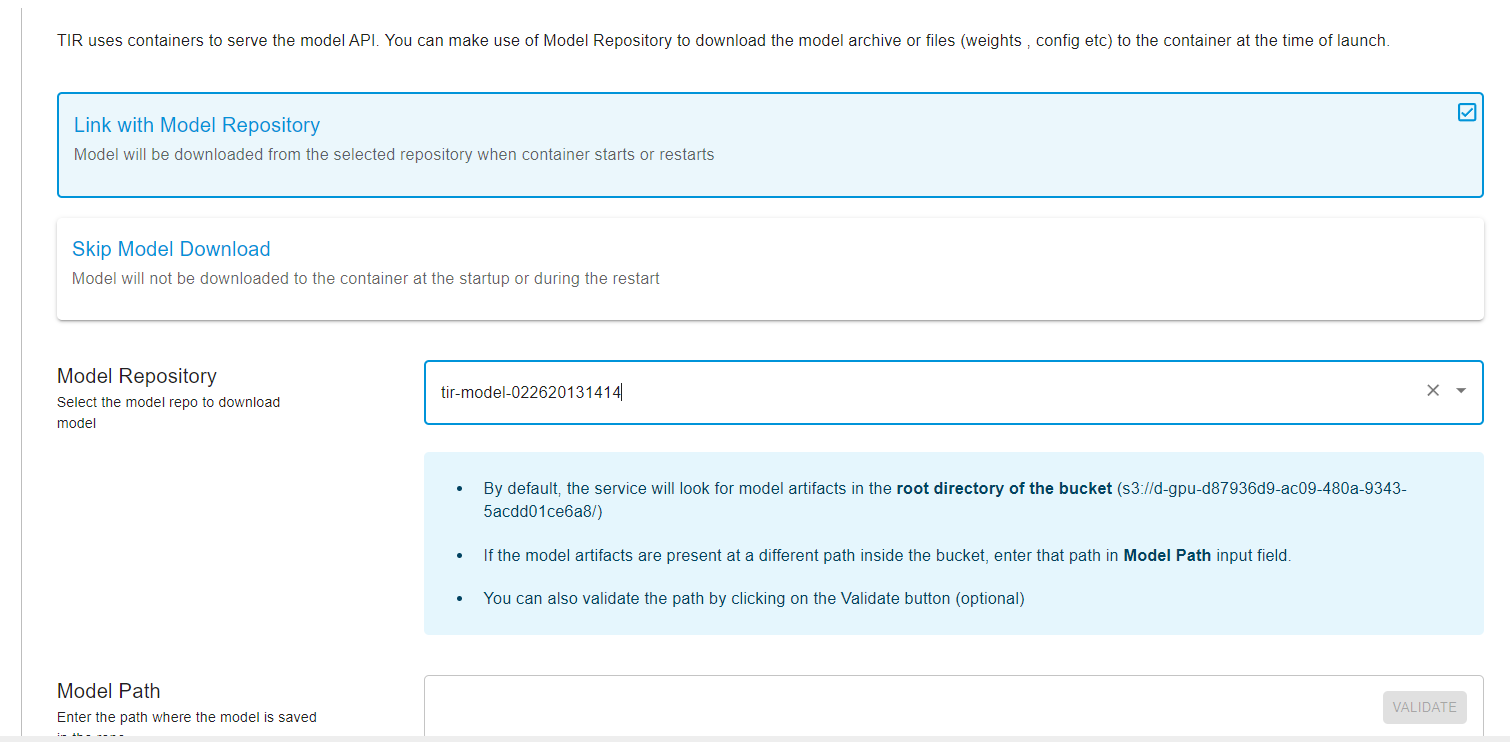
- Create a TIR Model and upload your model files.
- Pre-built containers will automatically fetch the model files from the EOS Bucket and start the API server.
- After the service is up, you can send requests to the API endpoint for inferences.
- Deploy with Your Own Container
If you prefer to use your custom container:
- Provide a public or private docker image.
- Launch the service, which can optionally pull model files from the EOS Bucket.
- The endpoint will be ready to handle inference requests.
Pre-Built Containers
TIR offers a range of pre-built containers that come with inference servers ready to serve requests using HTTP. These containers can connect to the EOS Object Storage to retrieve the model files when they start.
Deployment guides for supported frameworks include:
- TorchServe: A guide for deploying a TorchServe service.
- NVIDIA Triton: Instructions for deploying a Triton service.
- Llama 2: A tutorial for deploying Llama v2.
- CodeLlama: Steps for deploying the CodeLlama Service.
- Stable Diffusion: A tutorial for deploying the Stable Diffusion Inference Service.
- Custom Containers: A guide to building custom images for model deployments.
To set up a Model Endpoint:
- Navigate to 'Model Endpoints' under 'Inference' in the UI.
- Click 'CREATE ENDPOINT'.
- Select the desired framework.
- Upload the model and proceed to the next steps.
- Choose the machine type (GPU or CPU).
- Set the number of replicas and enable autoscaling if required.
- Name your endpoint and add any necessary environment variables.
- Complete the setup and click 'CREATE'.
Once the Model Endpoint is created:
- Overview: View details about the Endpoint and Plan.
- Logs: Access generated logs from the service.
- Monitoring: Monitor hardware and service metrics, including GPU/CPU utilization and memory usage.
- Auto Scaling: Manage the auto-scaling settings and adjust the number of desired replicas.
- Replica Management: Oversee and manage the service replicas, with options to delete them if necessary.

Pipelines
TIR Pipelines facilitate the creation and deployment of machine learning workflows that are both scalable and portable, leveraging the versatility of Docker containers. These pipelines are designed to streamline the process of taking models from development to production in a systematic and efficient manner. The support for Argo Workflows and Kubeflow Pipelines allows for integration into a variety of cloud-native CI/CD processes and Kubernetes-based orchestration systems.
Argo Workflows
Argo Workflows is a Kubernetes-native workflow engine that orchestrates parallel jobs on a Kubernetes cluster. It is particularly well-suited for workflows where tasks need to be executed in a specific sequence or in parallel. In the context of TIR Pipelines:

Kubeflow Pipelines
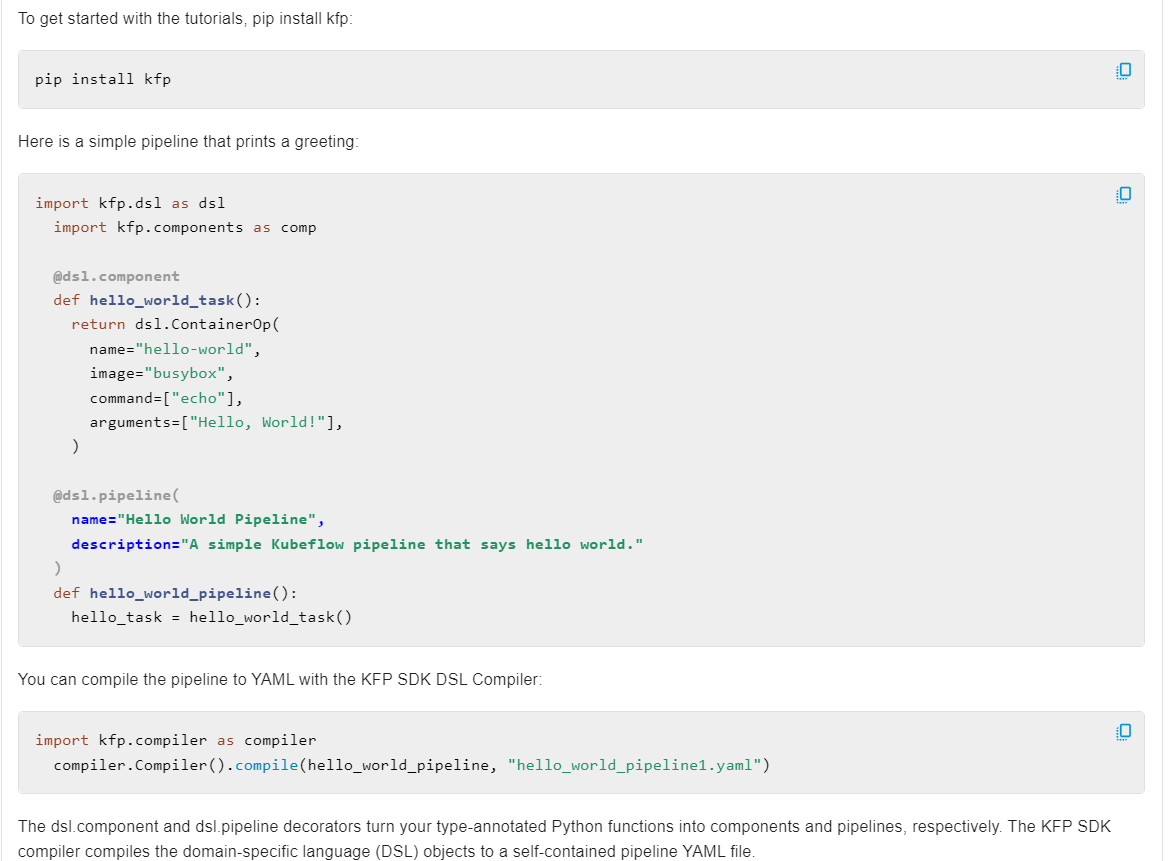
Kubeflow Pipelines is part of the Kubeflow project that aims to make deployments of machine learning (ML) workflows on Kubernetes simple, portable, and scalable. TIR's support for Kubeflow Pipelines offers:
Benefits of Using TIR Pipelines
- Ease of Use: TIR's integration with these workflow engines simplifies the process of defining, deploying, and managing ML pipelines.
- Collaboration: The use of standard formats and containerization facilitates collaboration among data scientists, engineers, and DevOps teams.
- Monitoring and Governance: The ability to monitor pipelines and maintain governance across all stages of ML model development and deployment.
By utilizing TIR Pipelines, organizations can enhance their ML operations, enabling faster iteration, improved reproducibility, and more efficient resource utilization.
Foundation Studio
The foundation studio offers an easy way to fine-tune models.
Fine-tuning a model involves adapting a pre-trained machine learning model to a particular task or data set. This concept is often associated with transfer learning, where a model initially trained on a broad dataset is later refined to improve performance on a more specific task or dataset.
To begin fine-tuning, select ‘Foundation Studio’ from the sidebar, then choose ‘Fine-Tune Models’ from the dropdown menu. This redirects you to the ‘Manage Fine-Tuning Jobs’ page.
Once directed to the ‘Manage Fine-Tuning Jobs’ page, users can initiate a new fine-tuning task by selecting either the ‘Create Fine-Tuning Job’ button or the ‘Click Here’ link to start crafting their fine-tuned models.
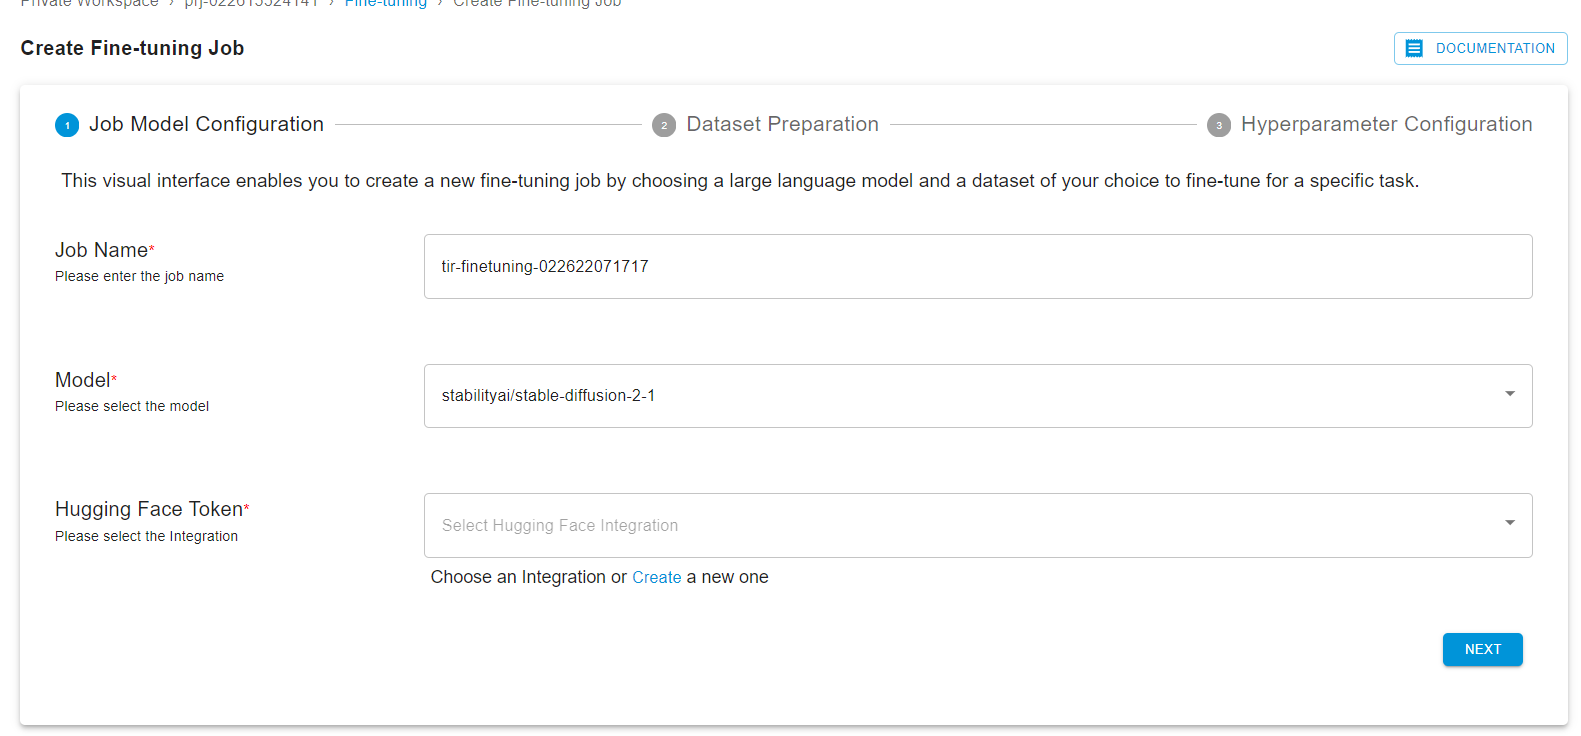
After selecting the dataset, you can upload objects in a particular dataset by selecting dataset and clicking on the ‘UPLOAD DATASET’ button.

Upon completing the dataset preparation step, the user will be taken to the Hyperparameter Configuration page. Here, one can customize the training process by providing the desired hyperparameter settings through the presented form, optimizing the model's performance through careful hyperparameter tuning.
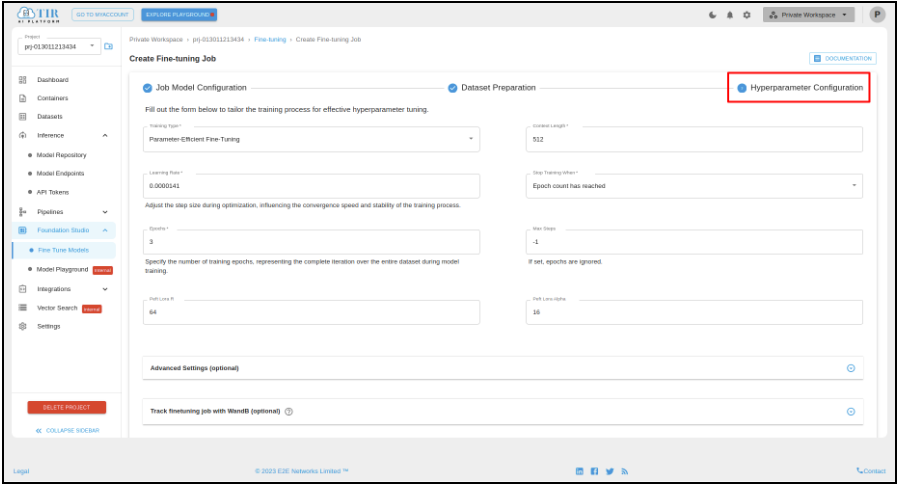
After filling out the hyperparameter details, you can launch the fine-tuning process.
Conclusion
In conclusion, the TIR AI Platform by E2E Networks offers a comprehensive and user-friendly environment tailored for machine learning and AI development lifecycle. This end-to-end solution streamlines workflows, from experimentation to production, ensuring that AI projects can be developed, deployed, and managed with ease and efficiency. Whether you're launching a Jupyter notebook, creating datasets, or deploying inference services, the TIR AI Platform stands as a robust ally in the rapidly evolving field of artificial intelligence.