Introduction
AI-generated images have transformed how designers, artists, and content providers produce visual content today. Artists and designers are using AI models to produce high-quality visuals from text prompts in order to enhance creativity and streamline workflows. On the other hand, ecommerce businesses are using this technology to generate customized product visuals and improve engagement. The ability to quickly generate tailored images is helping companies streamline and scale their content-generation pipelines.
A key development is the use of AI models like Flux.1, which can produce detailed, context-based visuals from simple text prompts. This is particularly useful for ecommerce companies, allowing them to create personalized product displays that cater to individual customer preferences, offering a more dynamic and visually appealing shopping experience.
In this article, we will walk you through the process of fine-tuning Flux.1 to generate tailored images for any e-commerce platform.
AI Toolkit
The AI Toolkit is a comprehensive tool created to streamline AI model training, especially for utilizing LoRA and Flux. It has an easy-to-use configuration for activities such as generating images, managing datasets, and training models. This toolkit provides flexibility during training by allowing users to customize particular layers for training and control VRAM usage. Also, it can connect with Hugging Face for sharing models and has a Gradio UI for effortless interaction while training.
Steps to Fine-Tune Flux.1
Step 1: Set Up the Environment and Clone the AI Toolkit
For fine-tuning image generation models like Flux.1, you need a high-end GPU like NVIDIA A100 which you can rent on E2E Cloud.
When launching the cloud GPU, make sure you add your public SSH key (id_rsa.pub). This will allow you to remote SSH into the node in the following way:
$ ssh root@
Once you have logged in, create a user using the adduser command, and add the user to the sudo-ers list using visudo.
$ adduser username
$ visudo
You can now create a Python virtual environment.
$ python3 -m venv .env
$ source .env/bin/activate
Install Jupyter Lab and then use that to build this example:
$ pip install jupyterlab
$ jupyter lab
Once you have your Jupyter environment set up, clone the ai-toolkit repository and install the following libraries:
git clone https://github.com/ostris/ai-toolkit
cd ai-toolkit
pip install torch peft
pip install -r requirements.txt
git submodule update --init --recursive
Step 2: Provide a Hugging Face Token
Replace xxxxxxxxxxxxx with your own Hugging Face token and make sure it has access to the Flux.1-dev model.
export HF_TOKEN=xxxxxxxxxxxxx
Step 3: Prepare the Dataset
Prepare a dataset for fine-tuning the Flux model. The dataset should contain at least 15-20 images in JPG format; create a corresponding text file containing captions for each image with the same name. In this tutorial, we explore visual representations with an Indian touch.
Example:
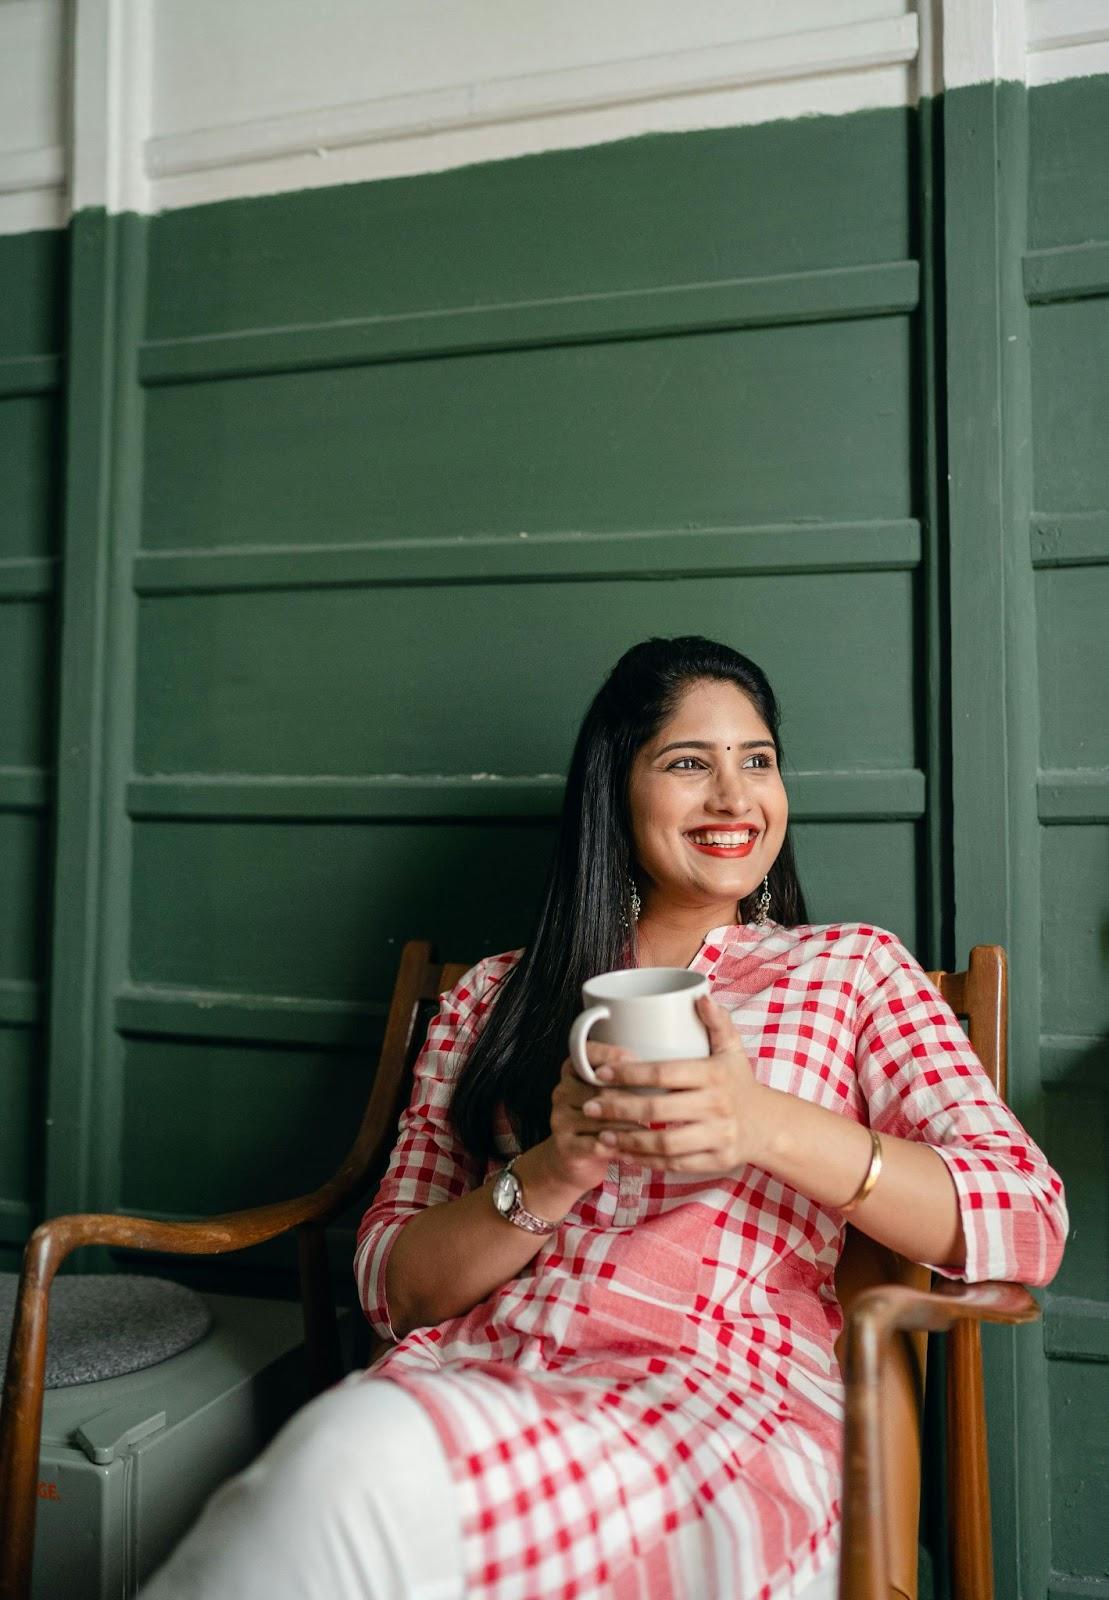
Caption:
A girl with long black hair is sitting indoors on a chair, smiling with her mouth slightly open. She is holding a cup or mug in her hand, wearing a wristwatch and bracelet as part of her jewelry. Her outfit is a dress, and the scene has a realistic feel, capturing a casual moment of her enjoying a drink.
Step 4: Set Up the Configurations
After preparing the dataset, you need to set up the configurations for fine-tuning the model. Navigate to ai-tookit/config/examples. There, you will find the train_lora_flux_24gb.yaml configuration file according to your needs. Here are the configurations I used for this project.
---
job: extension
config:
 # this name will be the folder and filename name
 name: "Fine_tuned_Flux.1”
 process:
   - type: 'sd_trainer'
     # root folder to save training sessions/samples/weights
     training_folder: "output"
     # uncomment to see performance stats in the terminal every N steps
#      performance_log_every: 1000
     device: cuda:0
     # if a trigger word is specified, it will be added to captions of training data if it does not already exist
     # alternatively, in your captions you can add [trigger] and it will be replaced with the trigger word
#      trigger_word: "p3r5on"
     network:
       type: "lora"
       linear: 16
       linear_alpha: 16
     save:
       dtype: float16 # precision to save
       save_every: 250 # save every this many steps
       max_step_saves_to_keep: 4 # how many intermittent saves to keep
       push_to_hub: false #change this to True to push your trained model to Hugging Face.
       # You can either set up a HF_TOKEN env variable or you'll be prompted to log-in
#       hf_repo_id: your-username/your-model-slug
#       hf_private: true #whether the repo is private or public
     datasets:
       # datasets are a folder of images. captions need to be txt files with the same name as the image
       # for instance image2.jpg and image2.txt. Only jpg, jpeg, and png are supported currently
       # images will automatically be resized and bucketed into the resolution specified
       # on windows, escape back slashes with another backslash so
       # "C:\\path\\to\\images\\folder"
       - folder_path: "/home/ml/projects/flux.1/ai-toolkit/dataset"
         caption_ext: "txt"
         caption_dropout_rate: 0.05  # will drop out the caption 5% of time
         shuffle_tokens: false  # shuffle caption order, split by commas
         cache_latents_to_disk: true  # leave this true unless you know what you're doing
         resolution: [ 512, 768, 1024 ]  # flux enjoys multiple resolutions
     train:
       batch_size: 1
       steps: 1000  # total number of steps to train 500 - 4000 is a good range
       gradient_accumulation_steps: 1
       train_unet: true
       train_text_encoder: false  # probably won't work with flux
       gradient_checkpointing: true  # need the on unless you have a ton of vram
       noise_scheduler: "flowmatch" # for training only
       optimizer: "adamw8bit"
       lr: 1e-4
       # uncomment this to skip the pre training sample
#        skip_first_sample: true
       # uncomment to completely disable sampling
#        disable_sampling: true
       # uncomment to use new vell curved weighting. Experimental but may produce better results
#        linear_timesteps: true

      # ema will smooth out learning, but could slow it down. Recommended to leave on.
       ema_config:
         use_ema: true
         ema_decay: 0.99

      # will probably need this if gpu supports it for flux, other dtypes may not work correctly
       dtype: bf16
     model:
       # huggingface model name or path
       name_or_path: "black-forest-labs/FLUX.1-dev"
       is_flux: true
       quantize: true  # run 8bit mixed precision

# low_vram: true  # uncomment this if the GPU is connected to your monitors. It will use less vram to quantize, but is slower.

    sample:
       sampler: "flowmatch" # must match train.noise_scheduler
       sample_every: 250 # sample every this many steps
       width: 1024
       height: 1024
       prompts:
         # you can add [trigger] to the prompts here and it will be replaced with the trigger word

# - "[trigger] holding a sign that says 'I LOVE PROMPTS!'"\

        - "woman with red hair, playing chess at the park, bomb going off in the background"
         - "a woman holding a coffee cup, in a beanie, sitting at a cafe"
         - "a horse is a DJ at a night club, fish eye lens, smoke machine, lazer lights, holding a martini"
         - "a man showing off his cool new t shirt at the beach, a shark is jumping out of the water in the background"
         - "a bear building a log cabin in the snow covered mountains"
         - "woman playing the guitar, on stage, singing a song, laser lights, punk rocker"
         - "hipster man with a beard, building a chair, in a wood shop"
         - "photo of a man, white background, medium shot, modeling clothing, studio lighting, white backdrop"
         - "a man holding a sign that says, 'this is a sign'"
         - "a bulldog, in a post apocalyptic world, with a shotgun, in a leather jacket, in a desert, with a motorcycle"
       neg: ""  # not used on flux
       seed: 42
       walk_seed: true
       guidance_scale: 4
       sample_steps: 20

# you can add any additional meta info here. [name] is replaced with config name at top

meta:
 name: "[name]"
 version: '1.0'
Step 5: Start the Training Process
After the dataset and configurations are ready, start the training process by navigating the AI Toolkit directory and running the following command:
python run.py config/examples/train_lora_flux_24gb.yaml
This process may take some time depending on your GPU and configurations.
Step 6: Test the Fine-Tuned Model
Now the fine-tuned model is ready to be tested. Test it first by loading the model through the Flux pipeline and adding the LoRA weights,
replace /home/vansh/ai-toolkit/output/Fine_tuned_Flux.1/Fine_tuned_Flux.1.safetensors with location and name of your saved model.
import torch
from diffusers import FluxPipeline

pipe = FluxPipeline.from_pretrained("black-forest-labs/FLUX.1-dev", torch_dtype=torch.bfloat16).to("cuda")
pipe.load_lora_weights("/home/vansh/ai-toolkit/output/Fine_tuned_Flux.1/Fine_tuned_Flux.1.safetensors",adapter_name="default")
pipe.enable_model_cpu_offload()
Add the prompt for the image you want to generate – its height, width, and name as you would like to save the image as.
prompt = "A girl wearing pink lehenga-choli in the Indian style, with earrings and necklace."
image = pipe(
   prompt,
   height=1024,
   width=1024
).images[0]
image.save("flux-dev3.png")
Display the image using the matplotlib library.
import matplotlib.pyplot as plt
import matplotlib.image as mpimg

img = mpimg.imread('flux-dev3.png')
plt.imshow(img)
plt.axis('off')
plt.show()
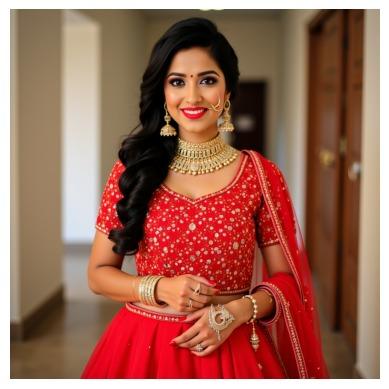
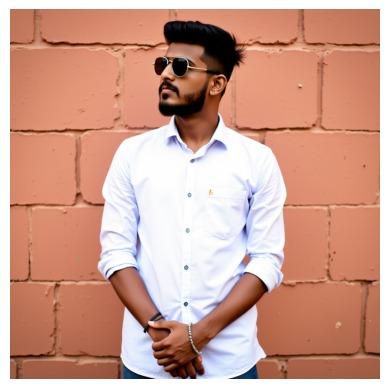
Outputs:
Prompt 1:
A dark-skinned girl with black hair is wearing a red lehenga, including a red skirt. She is smiling and looking directly at the viewer. Her jewelry includes earrings, a necklace, a bracelet, and a ring. The scene has a realistic feel, with a slightly blurry background that emphasizes her makeup and lipstick, creating a vibrant yet soft appearance.
Prompt 2:
A girl with black hair is standing and looking at the viewer. She is wearing a white lehenga, and adorned with jewelry including a bracelet, necklace, and earrings.

Prompt 3:
A dark-skinned handsome boy with short black hair and a beard is standing against a brick wall. He is wearing a white collared shirt with sleeves rolled up, denim jeans, and sunglasses. His hands are clasped together, and he is adorned with jewelry, including a bracelet. The image is realistic, with his feet out of the frame and his lips slightly parted.
Conclusion
By following this guide, you can easily fine-tune the Flux.1 model to generate high-quality, customized images tailored to your needs. By using tools such as the AI Toolkit, you can simplify the tasks of preparing datasets, configuring models, and generating images for achieving effective and visually appealing outcomes. This can be a very useful tool for ecommerce companies to market products and create personalized shopping experiences.