How to Build an AI Agent for Personalized Customer Experiences with LangGraph, LangChain and Gradio

February 10, 2025

Transforming Customer Experiences with Intelligent AI Assistants

Today’s customers increasingly demand detailed, accurate, and readily available information about products before making purchasing decisions. Whether it’s checking specifications, reading reviews, or asking general questions, businesses can significantly enhance customer experience by offering intelligent assistants that quickly retrieve and present relevant data.

In this project, we’ll demonstrate how to build an AI-powered assistant designed to provide personalized experiences for customers exploring Apple phones. This assistant will efficiently retrieve detailed phone specifications, extract and summarize user reviews, and answer general queries, all within an interactive chatbot interface. To achieve this, we’ll use:

  • LangGraph: A versatile workflow orchestration tool that simplifies designing and managing complex reasoning workflows.
  • LangChain: A robust framework that enables seamless integration of natural language processing (NLP) models with external data sources and facilitates multi-step reasoning.
  • Gradio: An intuitive library for creating customizable, user-friendly interfaces for AI applications, such as chatbots.

By leveraging these technologies, we will build a smart system that can efficiently classify queries, manage data retrieval, and provide context-aware responses tailored to users' needs.

Overview of the Data Sources

The assistant will draw insights from two main data repositories:

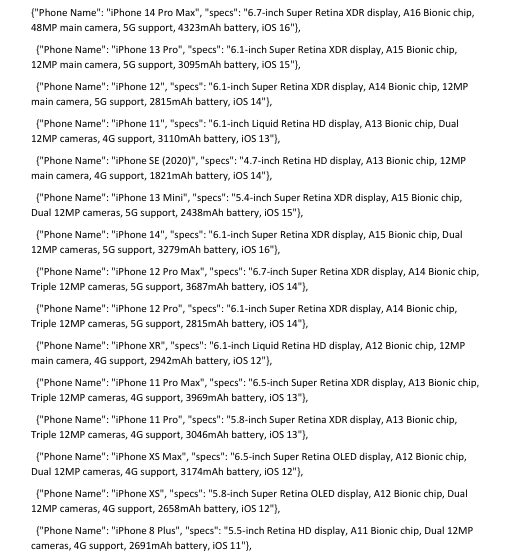
  1. Apple Phone Specifications: Data on features, technical specs, and other key details about Apple phones, extracted from datasets or documents.
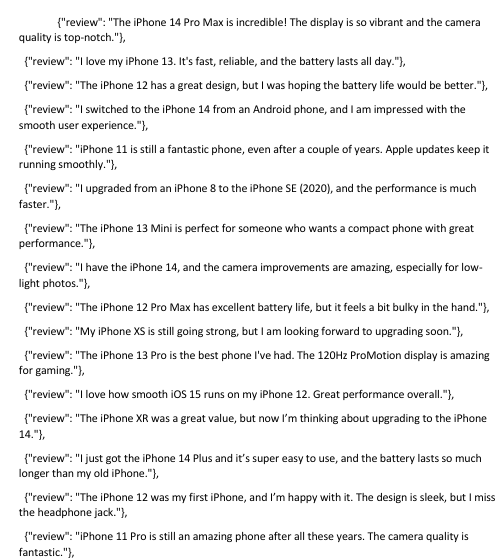
  2. Customer Reviews: User feedback and opinions on Apple phones, also sourced from structured datasets or text documents.

Key Features of the AI Assistant

The assistant will categorize and respond to three primary query types:

  1. Specifications Queries: Retrieves detailed information about Apple phone features, such as display, camera, and performance.
  2. Review-Based Queries: Summarizes or retrieves customer opinions and ratings to help users make informed decisions.
  3. General Queries: Handles broader questions like product comparisons or FAQs about Apple phones.

This categorization ensures users receive the most relevant and precise information for their needs.

Tools and Technologies

  1. LangGraph
    LangGraph helps us orchestrate the entire query-to-response workflow by defining clear decision-making paths. It allows us to create modular workflows where each query type (specifications, reviews, general) triggers a specific sub-task. LangGraph ensures our system can efficiently handle multi-step queries, such as combining specification details with a summary of user reviews.
  2. LangChain
    LangChain integrates large language models (LLMs) with the assistant’s data sources. By using LangChain’s capabilities, we can connect our assistant to structured datasets, perform in-depth query analysis, and ensure accurate, multi-stage reasoning for nuanced responses. Its tools for chaining tasks make it an ideal choice for processing complex queries involving both specifications and reviews.
  3. Gradio
    Gradio provides the user interface for our assistant. With its simple yet powerful framework, we’ll build an interactive chatbot interface that allows users to input queries, view detailed responses, and interact seamlessly. Gradio’s flexibility ensures the chatbot interface is not only functional but also visually appealing and intuitive.

Step-by-Step Process to Build the Assistant

Launching an E2E Node

Get started with E2E Cloud here. Here are some screenshots to help you navigate through the platform. Go to the Nodes option on the left side of the screen and open the dropdown menu. In our case, 100GB will work.

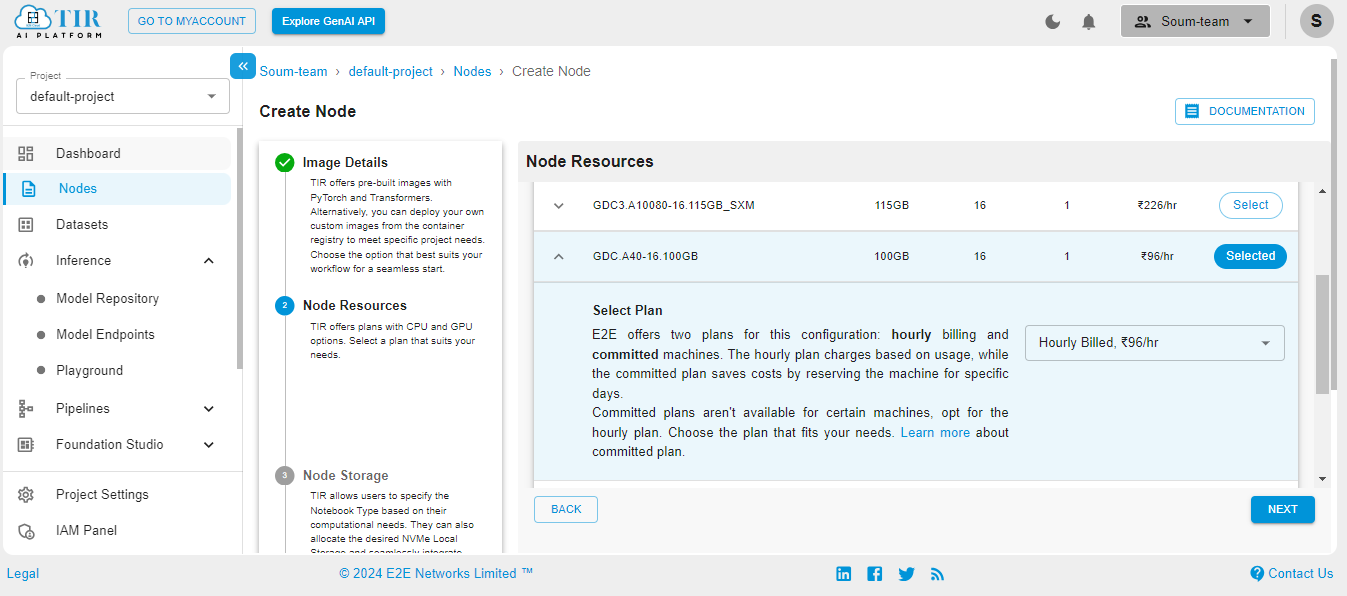
Select the size of your disk as 50GB – it works just fine for our use case. But you might need to increase it if your use case changes. 

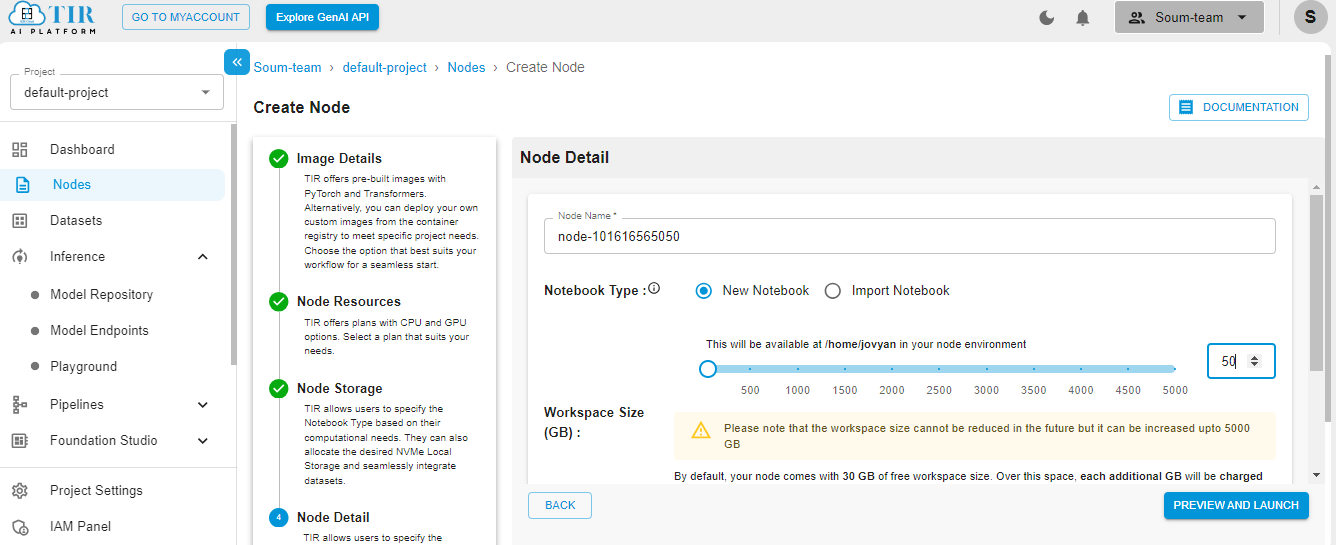
Hit Launch to get started with your E2E Node.

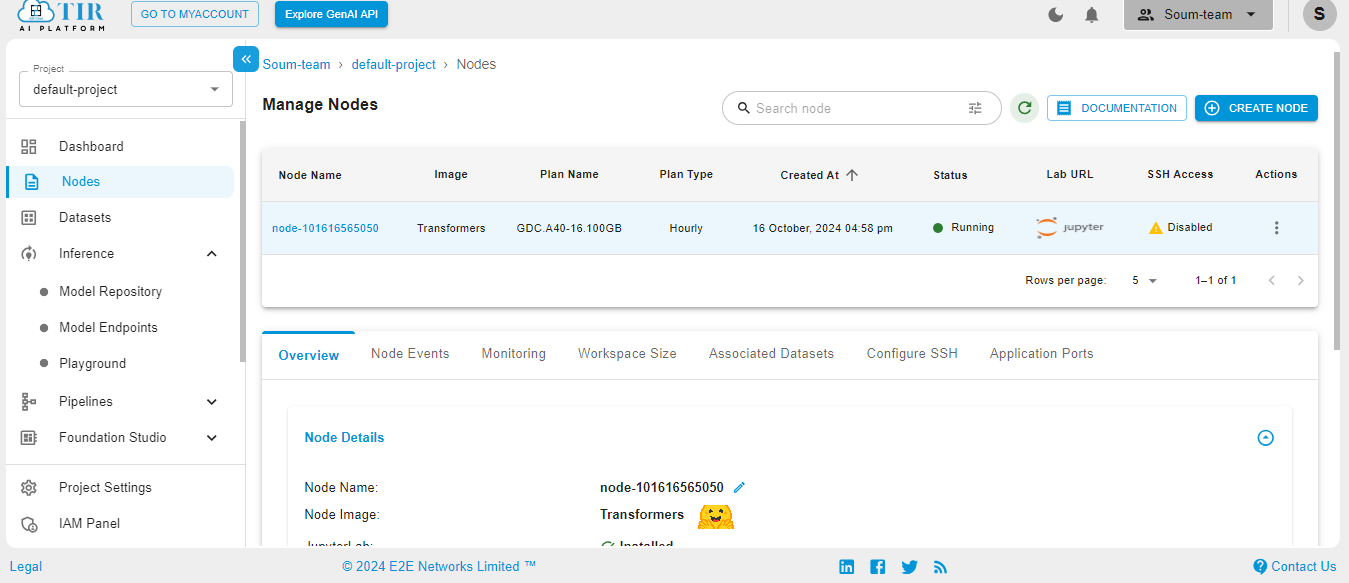
When the Node is ready to be used, it’ll show the Jupyter Lab logo. Hit on the logo to activate your workspace.

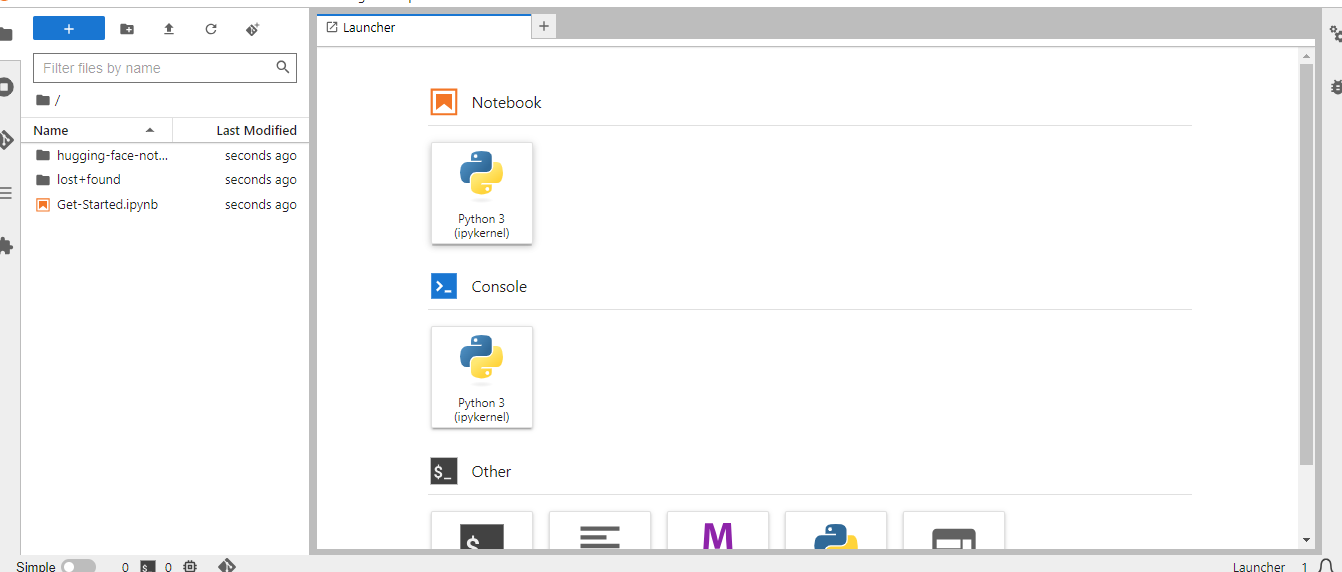
Select the Python3 pykernel, then select the option to get your Jupyter Notebook ready. Now you are ready to start coding.

Installation of the Required Libraries

Before we start building the Apple Phone Assistant, we need to install the necessary Python libraries. These libraries provide various functionalities, such as working with LangGraph for AI workflows, PyPDF2 for PDF processing, and Gradio for creating a user-friendly interface.

To install them, use the following command:

!pip install -q langgraph PyPDF2 gradio transformers
  • LangGraph: Helps in creating AI workflows and building stateful applications.
  • PyPDF2: Allows extraction of content from PDFs (useful for extracting Apple phone reviews and specs).
  • Gradio: Makes it easy to build interactive web-based UIs for machine learning models.

Once the installation is complete, we can move forward with creating the assistant.

Key Imports

This section covers the essential libraries and tools that enhance the functionality of the Apple Phone Assistant, enabling smooth user interactions and intelligent responses.

  1. PyPDF2
from PyPDF2 import PdfReader

PyPDF2 is used to extract text from PDF documents containing Apple phone specifications and customer reviews, which serve as the assistant’s knowledge base.

  1. LangGraph
from langgraph.graph 
import StateGraph
from langgraph.graph.message import add_messages
from typing import Annotated
from typing_extensions import TypedDict

LangGraph manages the flow of conversation, using StateGraph to handle states and add_messages to maintain the message history. It helps route user queries to the appropriate workflows (specifications, reviews, or general queries).

  1. Gradio
import gradio as gr

Gradio provides the front-end interface for the assistant, allowing users to interact through a simple chat interface where queries and responses are exchanged in real time.

  1. Transformers
import transformers
from transformers import AutoTokenizer, AutoModelForCausalLM

Transformers Library offers pre-trained models for text generation and tokenization, enabling the assistant to handle complex queries and generate accurate, human-like responses.

These libraries collectively enable a responsive, intelligent assistant capable of processing user queries about Apple phone specs, reviews, and more.

Logging into Hugging Face CLI

To use Hugging Face models and datasets in your local environment, you need to authenticate with the Hugging Face CLI. Here’s how you can log in:

!huggingface-cli login

Loading the Llama 3.1 Model and Creating a Text Generation Pipeline

In this section, we’ll load the Llama 3.1 model and create a text generation pipeline. This allows you to generate text based on any given input.

Load the Model and Tokenizer

The model ID used is "meta-llama/Llama-3.1-8B".

You can access the model here - https://huggingface.co/meta-llama/Llama-3.1-8B

The tokenizer and model are loaded using the AutoTokenizer and AutoModelForCausalLM classes from the transformers library. We specify the torch_dtype as bfloat16 to optimize the model for performance, and device_map="auto" ensures the model is automatically placed on the appropriate hardware (GPU or CPU).

Create the Text Generation Pipeline

We create a text generation pipeline using the transformers.pipeline function. The max_length=200 argument ensures that the generated text does not exceed 200 tokens.

Here’s the code to do this:

import torch
from transformers import AutoTokenizer, AutoModelForCausalLM
import transformers

# Load Llama 3.1 model and tokenizer
model_id = "meta-llama/Llama-3.1-8B"
tokenizer = AutoTokenizer.from_pretrained(model_id)
model = AutoModelForCausalLM.from_pretrained(model_id, torch_dtype=torch.bfloat16, device_map="auto")

# Create a text generation pipeline
pipeline = transformers.pipeline(
    "text-generation",
    model=model,
    tokenizer=tokenizer,
    max_length=1000
)

With this setup, you can now generate text by passing inputs to the pipeline. The model will generate coherent, contextually relevant responses based on the input provided.

Extracting Text from PDFs

In this section, we define a function to extract text from PDF documents. This can be particularly useful for processing customer reviews, product specifications, or other content stored in PDF format. We use the PyPDF2 library to read the PDF and extract its text.

Function Definition

  • The function extract_text_from_pdf(pdf_path) accepts the path to a PDF file as its input.
  • It initializes a PdfReader object from the PyPDF2 library to read the content of the PDF file.
  • The function then iterates through each page in the PDF and appends the extracted text to a string.
  • Finally, it returns the accumulated text.

Here's the code to extract text from PDFs:

from PyPDF2 import PdfReader

# Function to extract text from PDFs
def extract_text_from_pdf(pdf_path):
    reader = PdfReader(pdf_path)
    text = ""
    for page in reader.pages:
        text += page.extract_text()
    return text

You can now use this function to extract text from any PDF by providing its path. The text can then be processed further, such as for querying information or feeding it into a language model.

Loading Data from PDFs

After extracting the text from the PDF files, we load the data from the Apple phone specifications and customer reviews PDFs. This step will allow us to process and use the content within these documents in our AI-driven workflows.

Load PDF Data

  • We use the extract_text_from_pdf function that we defined earlier to extract the content from the two PDF files: one containing the Apple phone specifications (apple-specs.pdf) and the other containing customer reviews (customer-review-apple.pdf).
  • The extracted text is stored in two separate variables: specs_data and reviews_data.

Here's how the code works:

# Load data from PDFs
specs_pdf = "/content/apple-specs.pdf"
reviews_pdf = "/content/customer-review-apple.pdf"

specs_data = extract_text_from_pdf(specs_pdf)
reviews_data = extract_text_from_pdf(reviews_pdf)

After this step, you have the data from both PDFs ready to be used for query processing or integrated into your AI agent's workflow.

Specs Workflow Pipeline

In this implementation, we enhance the Specs Workflow by utilizing the Model pipeline for generating responses based on user queries about Apple phone specifications. The specs_workflow function works by taking the user's query and combining it with the technical specifications data extracted from PDFs. This combined input is then passed to a Llama3.1-8B text generation model (Llama 3.1 model) to produce a relevant response.

The function processes the input and generates a response detailing the specifications of the queried Apple phone model. The result is then returned to the user in a conversational format. If the pipeline fails to generate an answer, a fallback message is displayed. This approach offers a robust solution for querying specifications and makes use of a local model pipeline for efficient and scalable responses.

# Specs Workflow using pipeline
def specs_workflow(state: State):
    user_query = tuple(state["messages"][0])[0][1]  # Extract user query

    # Define the prompt with the user's query and the specs data
    prompt = f"You are an expert assistant who provides technical specifications about Apple phones. Use the following specs data to answer queries:\n\n{specs_data}\n\nUser Query: {user_query}\n\nProvide details about the query."

    # Generate the response using the pipeline
    response = pipeline(prompt, max_length=200, num_return_sequences=1)

    # Extract the generated text from the pipeline output
    generated_response = response[0]['generated_text'].strip()

    # Return the generated response or a fallback message if no response was found
    return {"messages": [("assistant", generated_response or "No specs found.")]}

Reviews Workflow 

In this Reviews Workflow, we leverage the LLM pipeline to generate responses to user queries about customer reviews for Apple phones. By utilizing a pre-trained model, this function efficiently processes the input query and matches it with a dataset of reviews, returning relevant responses in real-time.

The reviews_workflow function now utilizes the pipeline to produce detailed responses. The user's query is used to construct a prompt along with the review data, and the pipeline generates the corresponding reviews. If no reviews are found or a response isn't generated, the function will return a fallback message.

# Reviews Workflow using pipeline
def reviews_workflow(state: State):
    user_query = tuple(state["messages"][0])[0][1]  # Extract user query

    # Define the prompt with the user's query and the reviews data
    prompt = f"You are an expert assistant who provides customer reviews about Apple phones. Use the following reviews data to answer queries:\n\n{reviews_data}\n\nUser Query: {user_query}\n\nProvide customer reviews about the query."

    # Generate the response using the pipeline
    response = pipeline(prompt, max_length=200, num_return_sequences=1)

    # Extract the generated text from the pipeline output
    generated_response = response[0]['generated_text'].strip()

    # Return the generated response or a fallback message if no response was found
    return {"messages": [("assistant", generated_response or "No reviews found.")]}

Fallback Workflow for Handling Unmatched Queries

The Fallback Workflow handles all user queries that do not fit into predefined categories such as product specs or reviews. When a user's query doesn't match a specific workflow, the fallback system steps in, utilizing a LLM to generate a response from the model. This ensures that the assistant can still provide answers even for general or unforeseen queries.

In this updated workflow, the user's query is passed through the LLM  pipeline, which leverages the model to generate responses based on the input. If the model doesn't generate a suitable answer, the assistant will respond with a fallback message indicating the inability to process the query.

This structure ensures a smooth conversation flow even when the assistant is confronted with queries that are outside the predefined workflows.

# Fallback Workflow using pipeline
def fallback_workflow(state: State):
    user_query = tuple(state["messages"][0])[0][1]  # Extract user query

    # Define the prompt for generating a response with the pipeline
    prompt = f"You are a helpful assistant. Respond to the user's query in a clear and concise manner:\n\n{user_query}"

    # Generate the response using the pipeline
    response = pipeline(prompt, max_length=200, num_return_sequences=1)

    # Extract the generated text from the pipeline output
    generated_response = response[0]['generated_text'].strip()

    # Return the generated response or a fallback message if no response was found
    return {"messages": [("assistant", generated_response or "I'm sorry, I couldn't process your query.")]}

Classifying User Queries 

The classify_query_with_pipeline function utilizes the Llama3.1-8B  model pipeline to classify user queries into categories such as 'specs', 'reviews', or 'generic'. The function provides a text prompt that clearly instructs the assistant to classify the query into one of these categories, generating the result using the model pipeline. This approach leverages LLM robust capabilities to classify the user input and return the appropriate label.

def classify_query_with_pipeline(user_input: str):
    # Define the prompt for classification
    prompt = f"You are an intelligent assistant that classifies user queries into one of the following categories: 'specs', 'reviews', or 'generic'.\n\nClassify the following query: {user_input}"

    # Generate response using Hugging Face pipeline
    response = pipeline(prompt, max_length=50, num_return_sequences=1)

    # Extract the classification result
    classification = response[0]['generated_text'].strip()

    return classification

Routing User Queries to Appropriate Workflows

The route_workflow function acts as the decision-making component of the system. Based on the user's query, it classifies the query into categories such as 'specs', 'reviews', or 'generic' using the classify_query_with_pipeline function. After classification, the function routes the query to the corresponding workflow (specs_workflow, reviews_workflow, or fallback_workflow). This allows the assistant to handle different types of requests effectively, ensuring that the appropriate response is provided based on the user's query type.

# Router Node
def route_workflow(state: State):
    # Classify the user query into one of the categories: 'specs', 'reviews', or 'generic'
    query_type = classify_query_with_pipeline(tuple(state["messages"][0])[0][1])

    # Store the query type in the state for further processing
    state["query_type"] = query_type

    # Route to the appropriate workflow based on the query type
    if query_type == "specs":
        return specs_workflow(state)
    elif query_type == "reviews":
        return reviews_workflow(state)
    else:
        return fallback_workflow(state)

Creating the LangGraph Workflow

In this section, we create a LangGraph instance to manage the different workflows for the Apple Phone Assistant. We define a StateGraph and add the route_workflow as a node in the graph. The entry and finish points of the graph are set to the router node, ensuring that the system starts and ends with the query routing logic. Finally, the graph is compiled, ready to handle user queries through the specified workflows.

# Create LangGraph
graph_builder = StateGraph(State)

# Add workflows as nodes
graph_builder.add_node("router", route_workflow)

# Set entry and finish points
graph_builder.set_entry_point("router")
graph_builder.set_finish_point("router")

# Compile the graph
graph = graph_builder.compile()

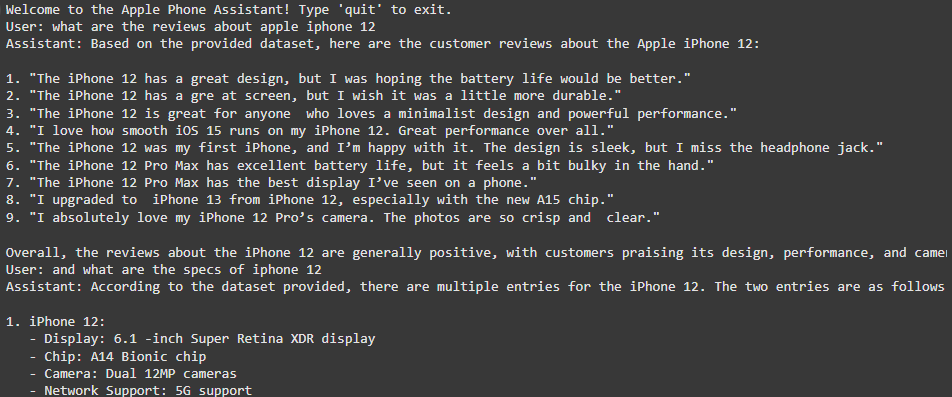
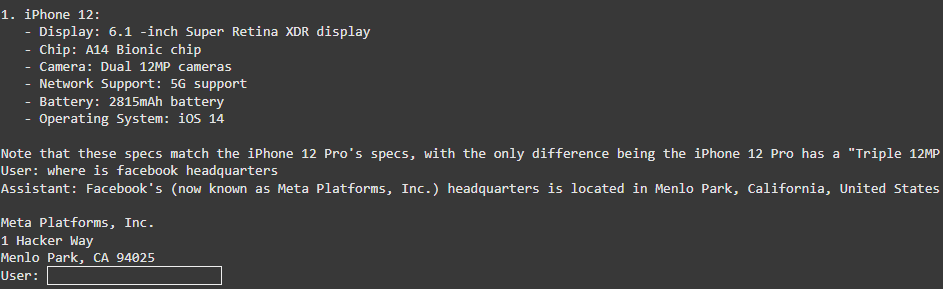
Running the Apple Phone Assistant Agent

In this section, we define the run_agent function that simulates a conversation with the Apple Phone Assistant. The function continuously accepts user input and processes the query through the LangGraph workflow. If the user types "quit" or "exit", the conversation ends. The agent processes the query by routing it to the appropriate workflow and displays the assistant's response. This process occurs within a loop, making the interaction continuous until the user chooses to exit.

# Run the Agent
def run_agent():
    print("Welcome to the Apple Phone Assistant! Type 'quit' to exit.")
    while True:
        user_input = input("User: ")
        if user_input.lower() in ["quit", "exit"]:
            print("Goodbye!")
            break

        # Process the query through LangGraph
        for event in graph.stream({"messages": [("user", user_input)], "query_type": "generic"}):
            for value in event.values():
                print("Assistant:", value["messages"][-1][1])
# Start the agent
if __name__ == "__main__":
    run_agent()

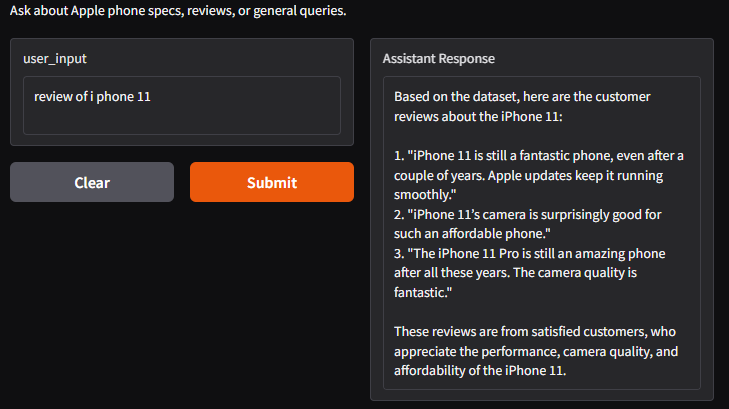
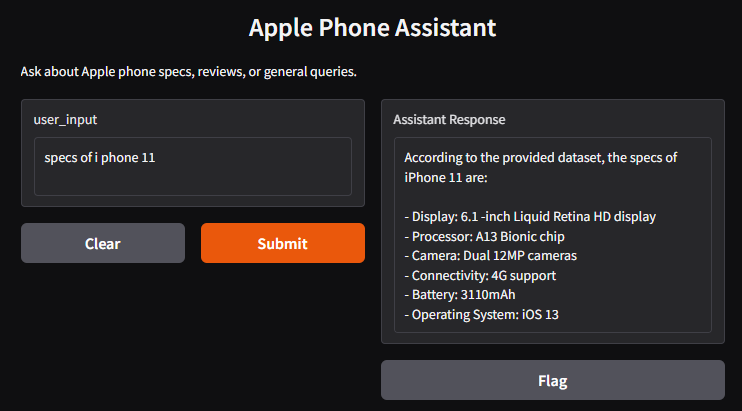
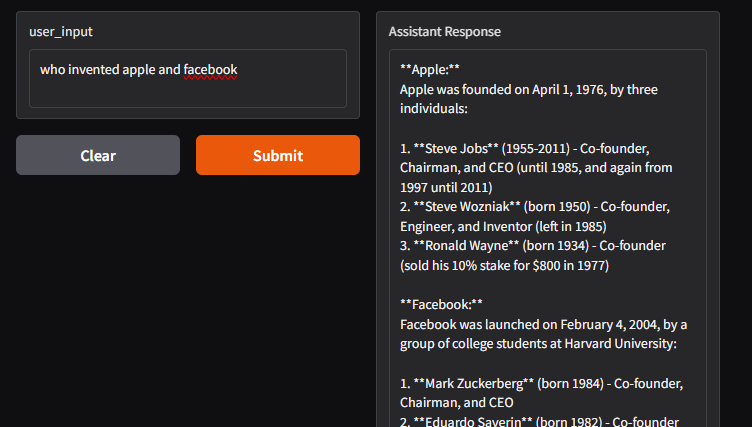
Building the Customer Assistant with a Gradio Interface

In this section, we create a user-friendly Gradio interface for the Apple Phone Assistant. The interface allows users to interact with the assistant through a simple web-based chatbot. Users can input queries, such as asking for specifications or reviews of Apple phones. The assistant processes the query using the LangGraph workflows, and the response is displayed on the interface. The application continues to run until the user types "quit" or "exit".

import gradio as gr

# Gradio interface function
def gradio_agent(user_input):
    if user_input.lower() in ["quit", "exit"]:
        return "Goodbye!"

    # Process the query through LangGraph
    responses = []
    for event in graph.stream({"messages": [("user", user_input)], "query_type": "generic"}):
        for value in event.values():
            responses.append(value["messages"][-1][1])  # Collect all assistant responses
    return "\n".join(responses)

# Create the Gradio interface
interface = gr.Interface(
    fn=gradio_agent,
    inputs=gr.Textbox(lines=2, placeholder="Enter your query here..."),
    outputs=gr.Textbox(label="Assistant Response"),
    title="Apple Phone Assistant",
    description="Ask about Apple phone specs, reviews, or general queries.",
    theme="compact"
)

# Launch the Gradio app
if __name__ == "__main__":
    interface.launch()

Summary

In this blog, we explored how to build an AI agent for personalizing customer experiences. By integrating LangGraph workflows with powerful language models, we created an intelligent assistant capable of handling a variety of customer queries related to Apple phone specifications and reviews. The assistant was designed to classify queries, respond with relevant data, and handle fallback scenarios, all while ensuring a seamless user experience.

With a Gradio interface, we made the system accessible and easy to use, providing an interactive platform where users can engage with the assistant in real time. This project demonstrates how AI agents can be effectively utilized to enhance customer experiences by offering personalized and context-driven interactions.

As AI continues to evolve, such systems can be expanded to address a broader range of customer needs, helping businesses offer tailored support and improve overall satisfaction.

Supporting Context

Specs

Reviews

Results

Why Choose E2E Cloud?

What E2E Cloud offers are the following:

  • Unbeatable GPU Performance: Access top-tier GPUs like H200, H100, and A100—ideal for state-of-the-art AI and big data projects.
  • India’s Best Price-to-Performance Cloud: Whether you’re a developer, data scientist, or AI enthusiast, E2E Cloud delivers affordable, high-performance solutions tailored to your needs.

Get Started Today

Ready to supercharge your projects with cutting-edge GPU technology?

  1. Sign up with E2E Cloud, or head to TIR.
  2. Launch a cloud GPU node tailored to your project needs.

E2E Cloud is your partner for bringing ambitious ideas to life, offering unmatched speed, efficiency, and scalability. Don’t wait—start your journey today and harness the power of GPUs to elevate your projects.

Latest Blogs
This is a decorative image for: A Complete Guide To Customer Acquisition For Startups
October 18, 2022

A Complete Guide To Customer Acquisition For Startups

Any business is enlivened by its customers. Therefore, a strategy to constantly bring in new clients is an ongoing requirement. In this regard, having a proper customer acquisition strategy can be of great importance.

So, if you are just starting your business, or planning to expand it, read on to learn more about this concept.

The problem with customer acquisition

As an organization, when working in a diverse and competitive market like India, you need to have a well-defined customer acquisition strategy to attain success. However, this is where most startups struggle. Now, you may have a great product or service, but if you are not in the right place targeting the right demographic, you are not likely to get the results you want.

To resolve this, typically, companies invest, but if that is not channelized properly, it will be futile.

So, the best way out of this dilemma is to have a clear customer acquisition strategy in place.

How can you create the ideal customer acquisition strategy for your business?

  • Define what your goals are

You need to define your goals so that you can meet the revenue expectations you have for the current fiscal year. You need to find a value for the metrics –

  • MRR – Monthly recurring revenue, which tells you all the income that can be generated from all your income channels.
  • CLV – Customer lifetime value tells you how much a customer is willing to spend on your business during your mutual relationship duration.  
  • CAC – Customer acquisition costs, which tells how much your organization needs to spend to acquire customers constantly.
  • Churn rate – It tells you the rate at which customers stop doing business.

All these metrics tell you how well you will be able to grow your business and revenue.

  • Identify your ideal customers

You need to understand who your current customers are and who your target customers are. Once you are aware of your customer base, you can focus your energies in that direction and get the maximum sale of your products or services. You can also understand what your customers require through various analytics and markers and address them to leverage your products/services towards them.

  • Choose your channels for customer acquisition

How will you acquire customers who will eventually tell at what scale and at what rate you need to expand your business? You could market and sell your products on social media channels like Instagram, Facebook and YouTube, or invest in paid marketing like Google Ads. You need to develop a unique strategy for each of these channels. 

  • Communicate with your customers

If you know exactly what your customers have in mind, then you will be able to develop your customer strategy with a clear perspective in mind. You can do it through surveys or customer opinion forms, email contact forms, blog posts and social media posts. After that, you just need to measure the analytics, clearly understand the insights, and improve your strategy accordingly.

Combining these strategies with your long-term business plan will bring results. However, there will be challenges on the way, where you need to adapt as per the requirements to make the most of it. At the same time, introducing new technologies like AI and ML can also solve such issues easily. To learn more about the use of AI and ML and how they are transforming businesses, keep referring to the blog section of E2E Networks.

Reference Links

https://www.helpscout.com/customer-acquisition/

https://www.cloudways.com/blog/customer-acquisition-strategy-for-startups/

https://blog.hubspot.com/service/customer-acquisition

This is a decorative image for: Constructing 3D objects through Deep Learning
October 18, 2022

Image-based 3D Object Reconstruction State-of-the-Art and trends in the Deep Learning Era

3D reconstruction is one of the most complex issues of deep learning systems. There have been multiple types of research in this field, and almost everything has been tried on it — computer vision, computer graphics and machine learning, but to no avail. However, that has resulted in CNN or convolutional neural networks foraying into this field, which has yielded some success.

The Main Objective of the 3D Object Reconstruction

Developing this deep learning technology aims to infer the shape of 3D objects from 2D images. So, to conduct the experiment, you need the following:

  • Highly calibrated cameras that take a photograph of the image from various angles.
  • Large training datasets can predict the geometry of the object whose 3D image reconstruction needs to be done. These datasets can be collected from a database of images, or they can be collected and sampled from a video.

By using the apparatus and datasets, you will be able to proceed with the 3D reconstruction from 2D datasets.

State-of-the-art Technology Used by the Datasets for the Reconstruction of 3D Objects

The technology used for this purpose needs to stick to the following parameters:

  • Input

Training with the help of one or multiple RGB images, where the segmentation of the 3D ground truth needs to be done. It could be one image, multiple images or even a video stream.

The testing will also be done on the same parameters, which will also help to create a uniform, cluttered background, or both.

  • Output

The volumetric output will be done in both high and low resolution, and the surface output will be generated through parameterisation, template deformation and point cloud. Moreover, the direct and intermediate outputs will be calculated this way.

  • Network architecture used

The architecture used in training is 3D-VAE-GAN, which has an encoder and a decoder, with TL-Net and conditional GAN. At the same time, the testing architecture is 3D-VAE, which has an encoder and a decoder.

  • Training used

The degree of supervision used in 2D vs 3D supervision, weak supervision along with loss functions have to be included in this system. The training procedure is adversarial training with joint 2D and 3D embeddings. Also, the network architecture is extremely important for the speed and processing quality of the output images.

  • Practical applications and use cases

Volumetric representations and surface representations can do the reconstruction. Powerful computer systems need to be used for reconstruction.

Given below are some of the places where 3D Object Reconstruction Deep Learning Systems are used:

  • 3D reconstruction technology can be used in the Police Department for drawing the faces of criminals whose images have been procured from a crime site where their faces are not completely revealed.
  • It can be used for re-modelling ruins at ancient architectural sites. The rubble or the debris stubs of structures can be used to recreate the entire building structure and get an idea of how it looked in the past.
  • They can be used in plastic surgery where the organs, face, limbs or any other portion of the body has been damaged and needs to be rebuilt.
  • It can be used in airport security, where concealed shapes can be used for guessing whether a person is armed or is carrying explosives or not.
  • It can also help in completing DNA sequences.

So, if you are planning to implement this technology, then you can rent the required infrastructure from E2E Networks and avoid investing in it. And if you plan to learn more about such topics, then keep a tab on the blog section of the website

Reference Links

https://tongtianta.site/paper/68922

https://github.com/natowi/3D-Reconstruction-with-Deep-Learning-Methods

This is a decorative image for: Comprehensive Guide to Deep Q-Learning for Data Science Enthusiasts
October 18, 2022

A Comprehensive Guide To Deep Q-Learning For Data Science Enthusiasts

For all data science enthusiasts who would love to dig deep, we have composed a write-up about Q-Learning specifically for you all. Deep Q-Learning and Reinforcement learning (RL) are extremely popular these days. These two data science methodologies use Python libraries like TensorFlow 2 and openAI’s Gym environment.

So, read on to know more.

What is Deep Q-Learning?

Deep Q-Learning utilizes the principles of Q-learning, but instead of using the Q-table, it uses the neural network. The algorithm of deep Q-Learning uses the states as input and the optimal Q-value of every action possible as the output. The agent gathers and stores all the previous experiences in the memory of the trained tuple in the following order:

State> Next state> Action> Reward

The neural network training stability increases using a random batch of previous data by using the experience replay. Experience replay also means the previous experiences stocking, and the target network uses it for training and calculation of the Q-network and the predicted Q-Value. This neural network uses openAI Gym, which is provided by taxi-v3 environments.

Now, any understanding of Deep Q-Learning   is incomplete without talking about Reinforcement Learning.

What is Reinforcement Learning?

Reinforcement is a subsection of ML. This part of ML is related to the action in which an environmental agent participates in a reward-based system and uses Reinforcement Learning to maximize the rewards. Reinforcement Learning is a different technique from unsupervised learning or supervised learning because it does not require a supervised input/output pair. The number of corrections is also less, so it is a highly efficient technique.

Now, the understanding of reinforcement learning is incomplete without knowing about Markov Decision Process (MDP). MDP is involved with each state that has been presented in the results of the environment, derived from the state previously there. The information which composes both states is gathered and transferred to the decision process. The task of the chosen agent is to maximize the awards. The MDP optimizes the actions and helps construct the optimal policy.

For developing the MDP, you need to follow the Q-Learning Algorithm, which is an extremely important part of data science and machine learning.

What is Q-Learning Algorithm?

The process of Q-Learning is important for understanding the data from scratch. It involves defining the parameters, choosing the actions from the current state and also choosing the actions from the previous state and then developing a Q-table for maximizing the results or output rewards.

The 4 steps that are involved in Q-Learning:

  1. Initializing parameters – The RL (reinforcement learning) model learns the set of actions that the agent requires in the state, environment and time.
  2. Identifying current state – The model stores the prior records for optimal action definition for maximizing the results. For acting in the present state, the state needs to be identified and perform an action combination for it.
  3. Choosing the optimal action set and gaining the relevant experience – A Q-table is generated from the data with a set of specific states and actions, and the weight of this data is calculated for updating the Q-Table to the following step.
  4. Updating Q-table rewards and next state determination – After the relevant experience is gained and agents start getting environmental records. The reward amplitude helps to present the subsequent step.  

In case the Q-table size is huge, then the generation of the model is a time-consuming process. This situation requires Deep Q-learning.

Hopefully, this write-up has provided an outline of Deep Q-Learning and its related concepts. If you wish to learn more about such topics, then keep a tab on the blog section of the E2E Networks website.

Reference Links

https://analyticsindiamag.com/comprehensive-guide-to-deep-q-learning-for-data-science-enthusiasts/

https://medium.com/@jereminuerofficial/a-comprehensive-guide-to-deep-q-learning-8aeed632f52f

This is a decorative image for: GAUDI: A Neural Architect for Immersive 3D Scene Generation
October 13, 2022

GAUDI: A Neural Architect for Immersive 3D Scene Generation

The evolution of artificial intelligence in the past decade has been staggering, and now the focus is shifting towards AI and ML systems to understand and generate 3D spaces. As a result, there has been extensive research on manipulating 3D generative models. In this regard, Apple’s AI and ML scientists have developed GAUDI, a method specifically for this job.

An introduction to GAUDI

The GAUDI 3D immersive technique founders named it after the famous architect Antoni Gaudi. This AI model takes the help of a camera pose decoder, which enables it to guess the possible camera angles of a scene. Hence, the decoder then makes it possible to predict the 3D canvas from almost every angle.

What does GAUDI do?

GAUDI can perform multiple functions –

  • The extensions of these generative models have a tremendous effect on ML and computer vision. Pragmatically, such models are highly useful. They are applied in model-based reinforcement learning and planning world models, SLAM is s, or 3D content creation.
  • Generative modelling for 3D objects has been used for generating scenes using graf, pigan, and gsn, which incorporate a GAN (Generative Adversarial Network). The generator codes radiance fields exclusively. Using the 3D space in the scene along with the camera pose generates the 3D image from that point. This point has a density scalar and RGB value for that specific point in 3D space. This can be done from a 2D camera view. It does this by imposing 3D datasets on those 2D shots. It isolates various objects and scenes and combines them to render a new scene altogether.
  • GAUDI also removes GANs pathologies like mode collapse and improved GAN.
  • GAUDI also uses this to train data on a canonical coordinate system. You can compare it by looking at the trajectory of the scenes.

How is GAUDI applied to the content?

The steps of application for GAUDI have been given below:

  • Each trajectory is created, which consists of a sequence of posed images (These images are from a 3D scene) encoded into a latent representation. This representation which has a radiance field or what we refer to as the 3D scene and the camera path is created in a disentangled way. The results are interpreted as free parameters. The problem is optimized by and formulation of a reconstruction objective.
  • This simple training process is then scaled to trajectories, thousands of them creating a large number of views. The model samples the radiance fields totally from the previous distribution that the model has learned.
  • The scenes are thus synthesized by interpolation within the hidden space.
  • The scaling of 3D scenes generates many scenes that contain thousands of images. During training, there is no issue related to canonical orientation or mode collapse.
  • A novel de-noising optimization technique is used to find hidden representations that collaborate in modelling the camera poses and the radiance field to create multiple datasets with state-of-the-art performance in generating 3D scenes by building a setup that uses images and text.

To conclude, GAUDI has more capabilities and can also be used for sampling various images and video datasets. Furthermore, this will make a foray into AR (augmented reality) and VR (virtual reality). With GAUDI in hand, the sky is only the limit in the field of media creation. So, if you enjoy reading about the latest development in the field of AI and ML, then keep a tab on the blog section of the E2E Networks website.

Reference Links

https://www.researchgate.net/publication/362323995_GAUDI_A_Neural_Architect_for_Immersive_3D_Scene_Generation

https://www.technology.org/2022/07/31/gaudi-a-neural-architect-for-immersive-3d-scene-generation/ 

https://www.patentlyapple.com/2022/08/apple-has-unveiled-gaudi-a-neural-architect-for-immersive-3d-scene-generation.html

Build on the most powerful infrastructure cloud

A vector illustration of a tech city using latest cloud technologies & infrastructure